
Two thumb tapes can look almost identical but behave very differently once applied. You have decided that self-adhesive thumb support tape is interesting, but you are not sure how the fit should work, how much elasticity you need, how adhesion matters, or how tight the tape should be. This guide walks you through fit, elasticity, adhesion, coverage, tension, and movement so you can choose with confidence. For a broader view of the FingerTipSplint range, start with thumb and finger support solutions.
Table of Contents
- What Makes Self-Adhesive Thumb Tape Different?
- Fit vs Elasticity vs Adhesion
- What a Good Fit Feels Like
- How Much Elasticity Do You Need?
- Does More Elasticity Mean Better?
- How Adhesion Affects Tape
- How to Measure and Choose
- Interactive Fit & Elasticity Selector
- 3D Tape Mechanics Infographic
- How to Apply for Better Fit
- How Tight Should It Be?
- Tape for Different Thumb Sizes
- Common Fit Problems
- 10 Mistakes That Ruin the Fit
- Tape vs Other Thumb Supports
- Product Guide
- When Tape May Not Be Right
- Doctor Advice
- Everyday Use
- Sports Use
- Buying Checklist
- 7 Quick Tips
- FAQ
Self-adhesive thumb support tape should feel secure without creating excessive pressure or unnecessarily restricting thumb movement. The right fit depends on the tape’s width, length, elasticity, coverage, and application tension. Buyers should follow the manufacturer’s instructions and reassess comfort, movement, skin response, and stability after application.
Updated for 2026: What Makes Self-Adhesive Thumb Tape Different?
Self-adhesive thumb tape is a specific category. Understanding what “self-adhesive” means, why adhesion matters, and why elasticity affects comfort helps you evaluate products more effectively.
What “Self-Adhesive” Means
The tape is designed to attach to itself or to appropriate surfaces according to the product’s design and instructions. Unlike tape that requires additional fasteners or wraps, self-adhesive thumb tape is designed to stay in position through its own adhesive properties. This makes application simpler and the overall profile lower.
Why Adhesion Matters
A support product can be well designed but still become inconvenient if it shifts during normal movement. Secure adhesion keeps the tape positioned where it is intended, so the support stays consistent through activity.
Why Elasticity Matters
Elasticity influences movement, tension, comfort, application, and the overall feel of support. A tape that is too stiff may restrict movement unnecessarily. A tape that is too stretchy may not provide the consistency you need. Elasticity is a practical variable, not a marketing feature.
Why Fit Matters More Than Simply Choosing “Tight”
Fit determines where the tape sits and how it interacts with the thumb. A tape that is too tight does not provide better support — it creates new problems. A tape that is too loose slides and loses positioning. The right fit is somewhere in the middle, and it depends on the tape’s design and your needs.
Fit vs Elasticity vs Adhesion: What’s the Difference?
These three concepts are often confused. Understanding the difference helps you evaluate any self-adhesive thumb tape.
Fit
Where and how the tape sits on the thumb. Fit determines the coverage area and the base tension level.
Elasticity
How much the material can stretch and return. Elasticity determines how the tape responds to movement.
Adhesion
How securely the tape remains positioned. Adhesion determines whether the tape stays where you put it.
Good fit does not automatically mean maximum elasticity. Strong adhesion does not mean the tape should be applied as tightly as possible. These three factors work together, and the right balance depends on your activity and your thumb.
What Does a Good Thumb Tape Fit Actually Feel Like?
Before you buy, it helps to know what you are aiming for. A good fit has specific, recognizable characteristics.
Secure but Not Excessively Tight
The tape should feel stable and supportive without creating persistent pressure. If you feel a tight, squeezing sensation, the tape is too tight.
Appropriate Thumb Movement
The thumb should be able to move as needed for your activity. If the tape restricts necessary movement, it is either the wrong tape or the wrong application.
No Unusual Pressure
There should be no pressure points, pinching, or sharp edges digging into the skin.
No Persistent Tingling or Numbness
Normal sensation should be maintained throughout the wear period. Numbness or tingling indicates the tape is too tight.
Comfortable Skin Contact
The material should feel comfortable against the skin without causing irritation.
Tape Should Stay Positioned
The tape should stay where you applied it during normal activity. If it slides or shifts, the fit or adhesion is not working.
| Good Fit | Poor Fit |
|---|---|
| Secure | Slipping |
| Comfortable | Excessive pressure |
| Appropriate movement | Unnecessarily restricted |
| Stable positioning | Wrinkling or gapping |
| Normal sensation | Numbness or tingling |
How Much Elasticity Should Thumb Support Tape Have?
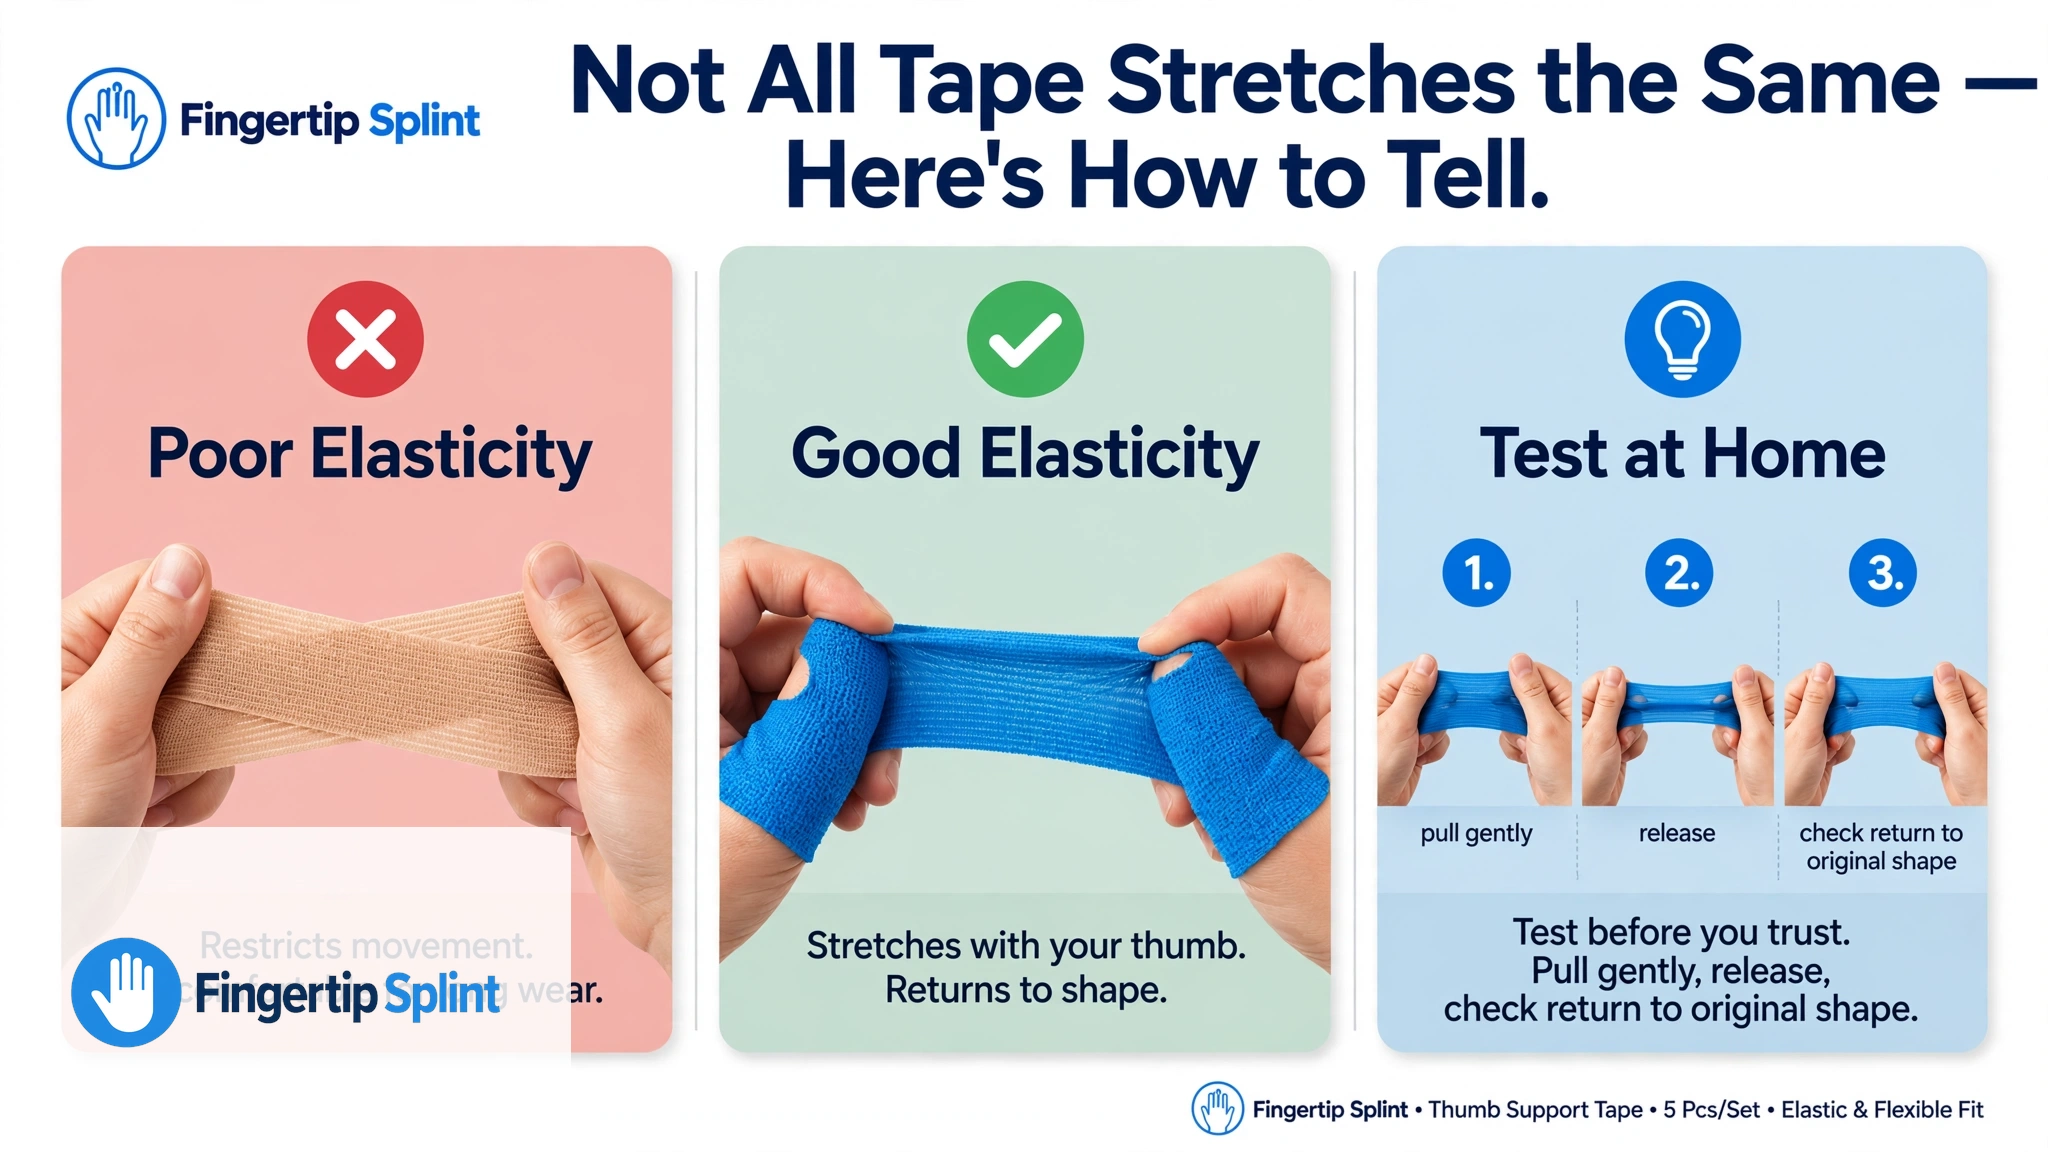
Elasticity is the tape’s ability to stretch and return to its original shape. It directly affects how the tape feels during movement and how much support it provides.
What Elasticity Does
Elastic material accommodates movement and changes in thumb position. When you bend or straighten your thumb, an elastic tape adjusts with you rather than fighting against the movement. This can make the tape more comfortable and more practical for activities that require movement.
Low Elasticity
Potential characteristics: less stretch, more consistent tension, may feel more restrictive depending on application. Low-elasticity tape can be useful when you want consistent support without much give.
Moderate Elasticity
Potential balance between support, movement, and comfort. Moderate elasticity is often the most versatile option because it provides some give without losing consistency.
High Elasticity
Potentially useful where greater flexibility is desired. However, excessive stretching or incorrect application can change the support feel and reduce the tape’s ability to maintain positioning.
Does More Elasticity Mean Better Thumb Support?
No. Elasticity is only one part of the decision. A useful way to think about this is:
A highly elastic tape can still be a poor choice if it slips, is incorrectly positioned, does not provide the desired level of support, irritates the skin, or requires excessive tension. The best tape is the one that balances all these factors for your situation.
How Adhesion Affects Self-Adhesive Thumb Tape
Why Tape Slips
Skin moisture
Sweat or moisture prevents the adhesive from bonding properly.
Oils or creams
Lotions, oils, or sunscreen create a barrier between the tape and the skin.
Incorrect application
Rushing the application or applying with wrinkles reduces adhesion.
Excessive movement
Repeated movement can stress the adhesive bond.
Inappropriate tension
Too much or too little tension affects how the tape stays positioned.
Poor positioning
Tape placed in the wrong area cannot stay positioned effectively.
Why Too Much Adhesion Isn’t Automatically Better
Very strong adhesion can make removal uncomfortable and irritate the skin. The goal is secure adhesion that holds during activity without causing skin damage when removed.
Preparing the Skin
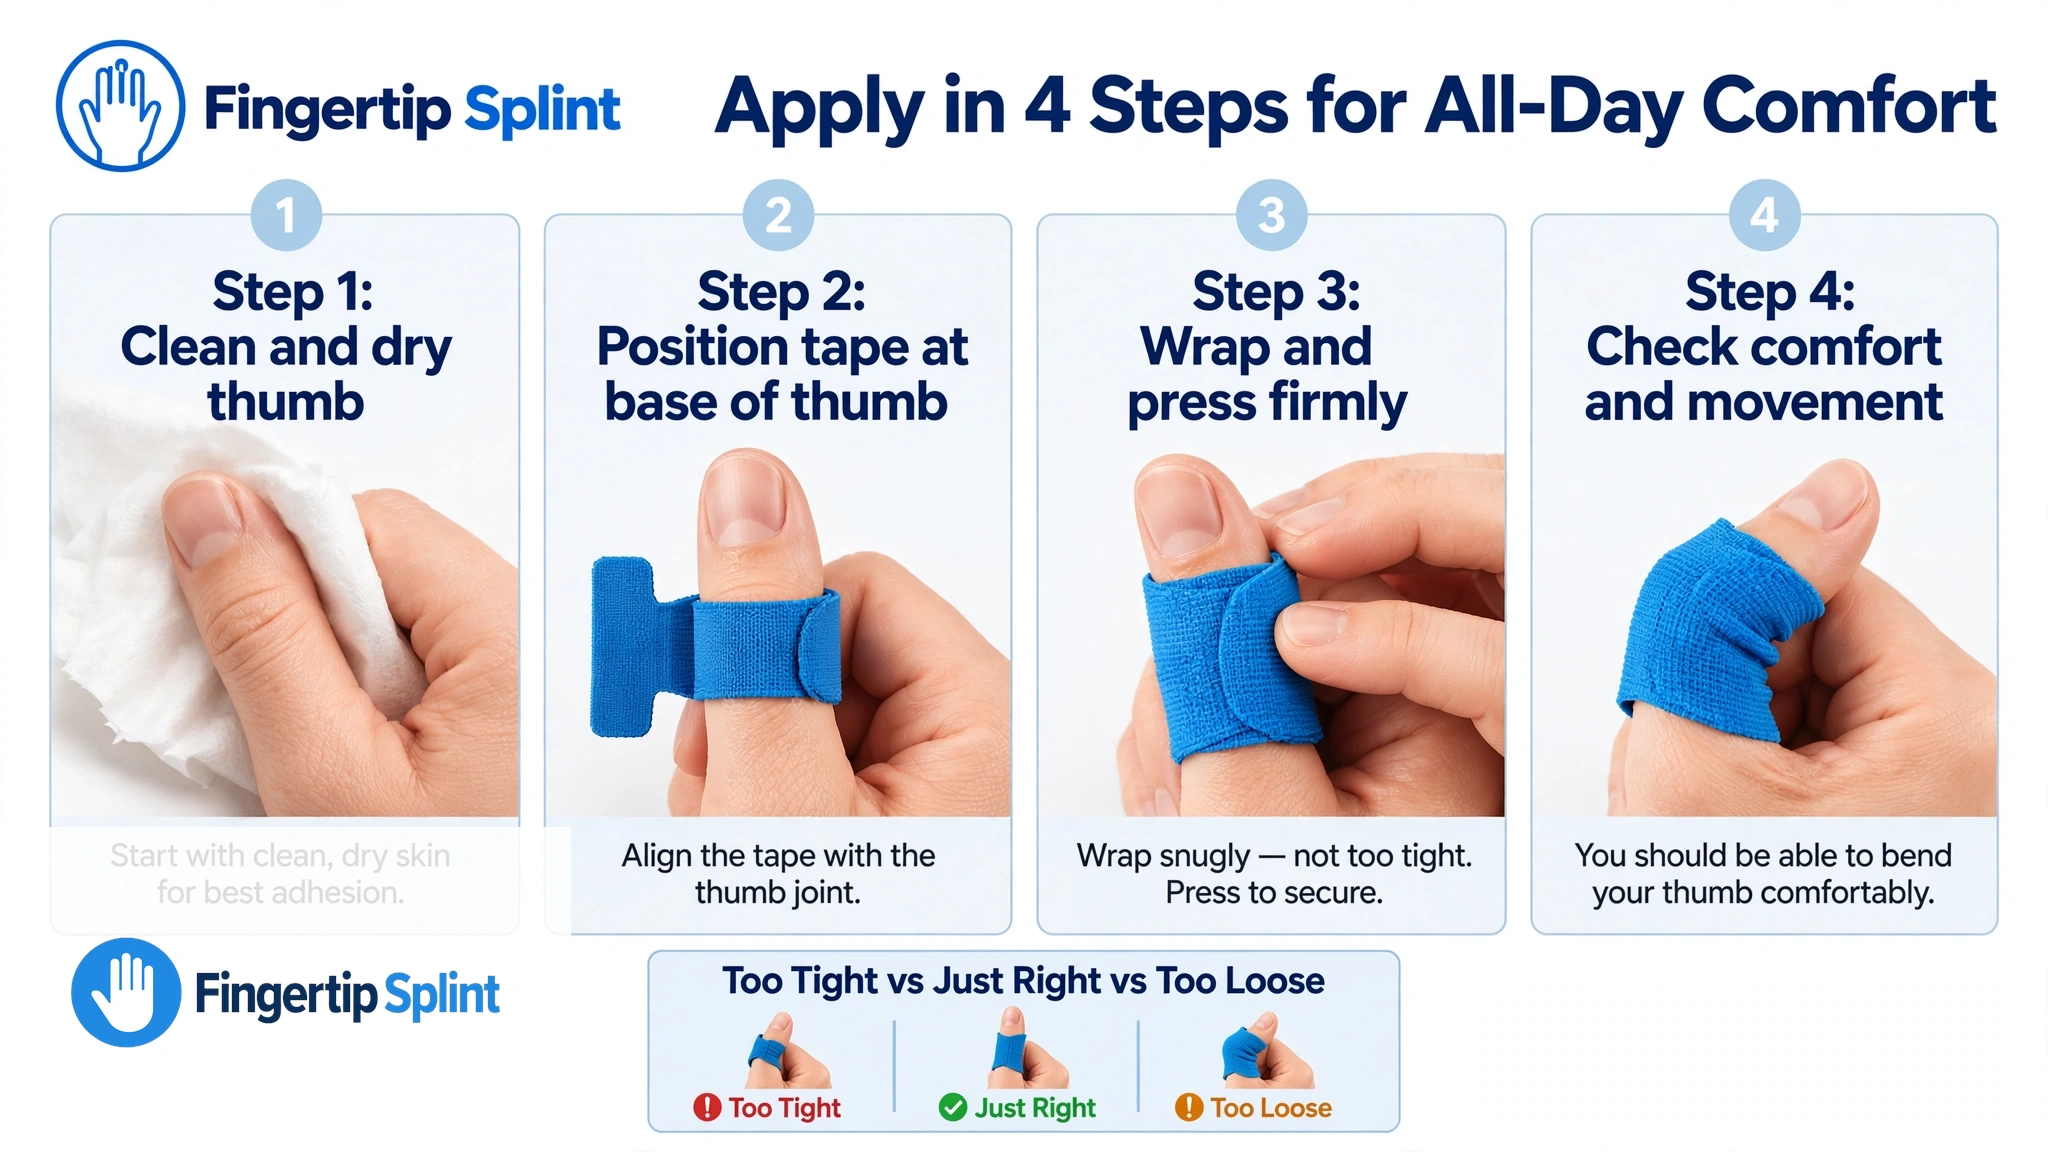
Clean and dry the skin before applying the tape. Avoid lotions, oils, and creams in the application area. Follow the manufacturer’s instructions for skin preparation.
How to Measure and Choose the Right Thumb Tape Fit
Step 1 — Identify the Area You Want to Support
Is it the base of the thumb, the thumb joint, the thumb tip, or the thumb-side wrist? Different areas require different coverage.
Step 2 — Check Product Dimensions
Look at tape width, tape length, stretch characteristics, and the intended application method. These dimensions determine whether the tape will work for your thumb.
Step 3 — Consider Thumb Size and Shape
Thumb circumference and length vary. A tape that works for one person may not work for another. Measure and compare with the specific product’s guidance.
Step 4 — Consider How Much Movement You Need
High movement requires more elasticity. Lower movement allows a more consistent tension. Match the tape’s characteristics to your activity.
Step 5 — Compare Your Requirements With Product Instructions
Read the product instructions carefully. They tell you how the tape is designed to be applied and what tension is appropriate.
Step 6 — Test the Application Before Full Activity
Apply the tape at home first. Test it during light movement before using it in a game or at work.
Interactive Thumb Tape Fit & Elasticity Selector
Answer four questions to see what product characteristics to compare. This is a buying guide, not a diagnostic tool.
Complete the four selections above to see what product characteristics to prioritize.
3D Interactive Thumb Tape Fit Infographic
The interactive 3D component explorer below shows how thumb support tape interacts with the thumb. Click each component to see what it does and why it matters.
Thumb Tape Mechanics Explorer
Click a component to learn what it does and why it matters when you are choosing tape.
How to Apply Self-Adhesive Thumb Support Tape for a Better Fit
How Tight Should Self-Adhesive Thumb Tape Be?
The Difference Between Secure and Tight
Secure is not the same as compressed as much as possible. A secure tape stays positioned without sliding, but does not create persistent pressure, numbness, or tingling.
Signs the Tape May Be Too Tight
- Numbness
- Tingling
- Significant discoloration
- Increasing discomfort
- Unusual coldness
- Excessive restriction
Signs It May Be Too Loose
- Sliding
- Folding
- Losing intended positioning
- Needing repeated adjustment
Finding the Practical Middle Ground
The goal is stable, comfortable, and appropriate movement. If the tape does not feel right, adjust the application rather than simply tightening it further.
Self-Adhesive Thumb Tape for Different Thumb Sizes
Smaller Thumbs
Consider width, overlap, and excessive bulk. A tape that is too wide for a smaller thumb may create wrinkles or feel bulky. Consider a narrower tape or a different application method.
Larger Thumbs
Consider coverage and available tape length. A tape that is too short may not complete the intended application. Check the product dimensions before ordering.
Wider vs Narrower Tape
Wider tape provides more coverage per wrap but may add bulk. Narrower tape is more flexible but may require more wraps. The right width depends on the coverage area and your comfort preference.
Why Product Dimensions Matter
Compare actual manufacturer specifications rather than assuming all “thumb tape” products are the same. Different products have different widths, lengths, and elasticity characteristics.
Common Self-Adhesive Thumb Tape Fit Problems
Tape keeps slipping
Possible reason: moisture, oil, or incorrect tension. What to check: skin preparation and application method. Safer adjustment: reapply to clean, dry skin.
Tape rolls or folds
Possible reason: improper application or excessive movement. What to check: application method and activity compatibility. Safer adjustment: reapply with attention to edges.
Tape feels too tight
Possible reason: excessive tension. What to check: whether the tape is stretched too much. Safer adjustment: reduce tension on reapplication.
Tape doesn’t cover the intended area
Possible reason: incorrect positioning or coverage. What to check: whether the tape path matches the support need. Safer adjustment: reposition on reapplication.
Tape feels too restrictive
Possible reason: too much coverage or too little elasticity. What to check: whether the tape matches your movement needs. Safer adjustment: reduce coverage or choose a more elastic tape.
Adhesion doesn’t last as expected
Possible reason: product characteristics, skin type, or activity. What to check: manufacturer guidance and skin preparation. Safer adjustment: consider a different product or application method.
10 Mistakes That Can Ruin the Fit
Excessive tension causes numbness, tingling, and discomfort.
What to do instead: secure and comfortable, not tight.
Width and length determine coverage and application options.
What to do instead: check the specific product’s dimensions.
Elasticity is one factor, not the entire decision.
What to do instead: evaluate fit, adhesion, and coverage together.
Moisture prevents proper adhesion.
What to do instead: clean and dry the skin first.
Excessive tape can add bulk and reduce movement.
What to do instead: apply the minimum needed for support.
Over-coverage restricts movement unnecessarily.
What to do instead: cover the support area without over-restricting.
A tape that restricts necessary movement will not be worn consistently.
What to do instead: test movement after application.
These are warning signs, not signs the tape is working.
What to do instead: remove the tape and reassess the application.
Adhesion and elasticity degrade with reuse.
What to do instead: follow the manufacturer’s replacement guidance.
Different situations require different support levels.
What to do instead: match the tape to your specific situation.
Self-Adhesive Thumb Tape vs Other Thumb Supports
| Feature | Self-Adhesive Tape | Elastic Thumb Strap | Thumb Sleeve | Structured Thumb Brace |
|---|---|---|---|---|
| Flexibility | High, varies | High, varies | High | Lower, varies |
| Adjustability | Application-based | Often adjustable | Limited | Varies |
| Bulk | Usually low | Low to moderate | Low | Moderate |
| Movement | Usually flexible | Flexible | Flexible | More restricted |
| Main buying focus | Fit, adhesion, elasticity | Strap adjustment | Comfort, coverage | Structured support |
Product design and intended use vary. This comparison is a starting point, not a universal recommendation.
FingerTipSplint Self-Adhesive Thumb Support Tape Product Guide
Use this section as a worked example of how to evaluate thumb support tape against the criteria in this guide. The product being evaluated is the 5-piece self-adhesive thumb support tape from FingerTipSplint.
5Pcs Self-Adhesive Thumb Support Tape
- Self-adhesive format: Designed for convenient application without additional fasteners
- Elastic support characteristics: Designed to flex with the thumb during movement
- Application: Follow the manufacturer’s instructions for correct placement
- Fit considerations: Check the product page for dimensions and sizing guidance
- Multi-piece format: 5 pieces for multiple applications or replacement
- Intended use: Thumb support for sports and daily activities
What Makes the Product Relevant to This Buying Guide?
The self-adhesive format, elastic support characteristics, application method, fit considerations, and multi-piece format are the product characteristics most relevant to fit and elasticity. If your priority is a self-adhesive format that can be positioned around the thumb while allowing some flexibility, this product format may be worth comparing with other support options.
What to Check Before Ordering
Verify dimensions, material, elasticity, application instructions, intended use, quantity, and skin considerations. For buyers comparing different thumb support options, explore the FingerTipSplint shop.
When Self-Adhesive Thumb Tape May Not Be the Right Solution
Support tape is not appropriate for every situation. It should not be used to delay appropriate professional assessment when symptoms are concerning.
- Significant thumb injury
- Visible deformity
- Major swelling
- Severe or increasing pain
- Major loss of movement
- Persistent numbness or tingling
- Symptoms that do not improve
Doctor Advice: What Matters More Than Tape Brand?
This section is written in the tone of a practical professional checklist. It is not a diagnosis and does not replace an in-person assessment.
Correct fit
Fit determines whether the tape provides support in the right area.
Appropriate support
Support should match the situation, not be maximum by default.
Preserving necessary movement
A tape that restricts necessary movement is not appropriate.
Skin tolerance
Adhesive should not cause irritation, redness, or discomfort.
Matching support to the situation
Different activities and situations require different support levels.
Reassessing persistent symptoms
Symptoms that persist or worsen deserve professional assessment.
Additional trusted resources include the Mayo Clinic thumb arthritis overview, the Cleveland Clinic sprained thumb resource, the AAOS OrthoInfo thumb arthritis page, the ASSH flexor tendon injury resource, the MedlinePlus thumb injuries page, the NHS hand pain guidance, the WebMD splints overview, and the Healthline thumb brace resource.
Elasticity and Fit During Everyday Use
Writing
Repeated thumb and finger positioning. The tape should maintain position without interfering with pen control.
Typing
Thumb movement for keyboard use. The tape should allow enough mobility for typing.
Smartphone use
Repetitive thumb movement. The tape should preserve scrolling, tapping, and swiping.
Household activities
Grip and repeated handling. The tape should stay secure and handle moisture.
Repetitive gripping
Manual work and repeated motion. The tape should maintain position without excessive restriction.
The central question for everyday use: does the tape maintain its position without becoming unnecessarily restrictive?
Elasticity and Fit During Sports
Sports place specific demands on thumb support tape. Movement matters because sports involve repeated hand action. Secure adhesion matters because a tape that shifts during play becomes a distraction. Application tension matters because excessive tension can restrict the movement you need for performance.
For a full activity-by-activity guide, see our article on the best thumb support tape for sports and daily use. For a comparison of strap and tape designs, see our guide on elastic thumb support straps and how to choose the right tape.
Self-Adhesive Thumb Support Tape Buying Checklist
Click each item to confirm. Aim to check all 8 before buying.
7 Quick Tips for Better Thumb Tape Fit
Frequently Asked Questions
It should be secure and comfortable, not excessively tight. You should be able to wear it without numbness, tingling, significant discoloration, or increasing pain. Excessive tightness does not improve support — it creates new problems.
If concerning symptoms occur, remove the tape and reassess the application rather than tightening it further.
Elasticity refers to the tape’s ability to stretch and return to its original shape. It directly affects how the tape responds to thumb movement and how much give it provides during activity.
Low-elasticity tape provides more consistent tension. High-elasticity tape accommodates more movement. Moderate elasticity is often the most versatile option.
Not automatically. Elasticity is one part of the decision, and the right level depends on your activity and needs. A highly elastic tape can still be a poor choice if it slips, is incorrectly positioned, does not provide the desired support level, or requires excessive tension.
The useful framework is: Elasticity + Fit + Adhesion + Coverage + Application = Overall usability.
A correct fit is secure but not excessively tight, allows appropriate thumb movement, does not create pressure points, maintains normal sensation, and stays positioned during activity. If any of these are not true, the fit needs adjustment.
Check the skin after removal. Redness, pressure marks, or irritation suggest the tape is too tight or the material is not suitable for your skin.
Common reasons include skin moisture, oils or creams on the skin, incorrect application, excessive movement, inappropriate tension, or poor positioning. Skin preparation and application method are the most common fixes.
If slipping continues despite proper preparation, the tape’s adhesive characteristics may not match your skin type or activity.
Daily use depends on the product, your skin tolerance, your activity, and the manufacturer’s instructions. A low-profile tape may be comfortable for daily use, but regular skin checks are important. Allow the skin to recover between applications if irritation develops.
If you notice redness, itching, numbness, or discomfort, remove the tape and reassess.
Remove the tape if you experience numbness, tingling, significant discoloration, increasing pain, skin irritation, or worsening symptoms. These are warning signs that the tape may not be appropriate for your situation or that the application needs adjustment.
Follow the manufacturer’s guidance on wear duration. If symptoms persist after removing the tape, seek professional assessment.
Find the Right Fit, Not Just the Tightest Fit
The right thumb tape is not simply the tape that feels tightest. It is the tape whose elasticity, adhesion, coverage, and fit work together for the way you use your thumb. Evaluate the 5Pcs Self-Adhesive Thumb Support Tape against these criteria before deciding.
Explore the FingerTipSplint shop for other support options, check the FingerTipSplint FAQ, or use the request-a-quote page for bulk or business purchasing. For medical finger splint supply, see the medical finger splint supplier page.
View the Product Explore Thumb SupportFinal Takeaway: Fit, Elasticity, and Adhesion Work Together
Fit determines where the tape sits. Elasticity determines how it responds to movement. Adhesion helps it stay positioned. Application determines how those characteristics work together. Understanding these four elements lets you evaluate any self-adhesive thumb support tape with more confidence.
The framework is simple: Fit + Elasticity + Adhesion + Coverage + Movement = Better Tape Selection. If symptoms persist, worsen, or involve significant injury, severe pain, major swelling, deformity, numbness, or loss of function, do not simply cover the area with tape. Seek appropriate medical evaluation. For medical finger splint supply and distribution, see the medical finger splint supplier page and the finger splint distributor page. For the full FingerTipSplint range, visit the FingerTipSplint homepage.