
Trigger Finger Splint Buying Guide: Fit, Features & Support
Online listings can make different splints look almost identical. One says trigger finger support. Another says finger brace. Another says adjustable splint or nighttime splint. But the important questions are: Does it fit your finger? Does it provide the intended support? Can you adjust it correctly? Will you actually be comfortable wearing it? This guide answers those questions with a practical fit, features, and support framework.
If you have not yet decided which type of support you need, start with our complete trigger finger support guide. This article focuses on evaluating, fitting, and comparing a specific splint before you order.
What This Guide Can—and Cannot—Do
Splinting can be part of conservative trigger-finger care. A product page cannot diagnose the condition. Different finger problems require different support designs, and wearing a device incorrectly can create pressure or skin problems. Professional guidance matters when symptoms are severe, persistent, or unclear.
The Mayo Clinic trigger finger diagnosis and treatment guidance currently lists splinting among conservative treatments and notes that treatment depends on symptom severity and duration. The Cleveland Clinic finger splint overview also notes risks from improperly used finger splints, including pressure sores and nerve impingement. For medical finger splint supply information, see FingerTipSplint’s medical finger splint supplier page.
A trigger finger splint buying guide should focus on fit, finger positioning, support level, adjustability, comfort, material, closure, and intended use. Choose a design that follows its manufacturer sizing and wearing instructions without creating excessive pressure. Splinting may be part of conservative trigger-finger care, but persistent or severe symptoms should be evaluated by a healthcare professional.
Table of Contents
- What This Guide Can and Cannot Do
- What Makes a Trigger Finger Splint Different?
- 8 Features to Check Before Buying
- 3D Anatomy of a Trigger Finger Splint
- Interactive Feature Explorer
- Trigger Finger Splint Fit & Sizing
- Interactive Fit Checker
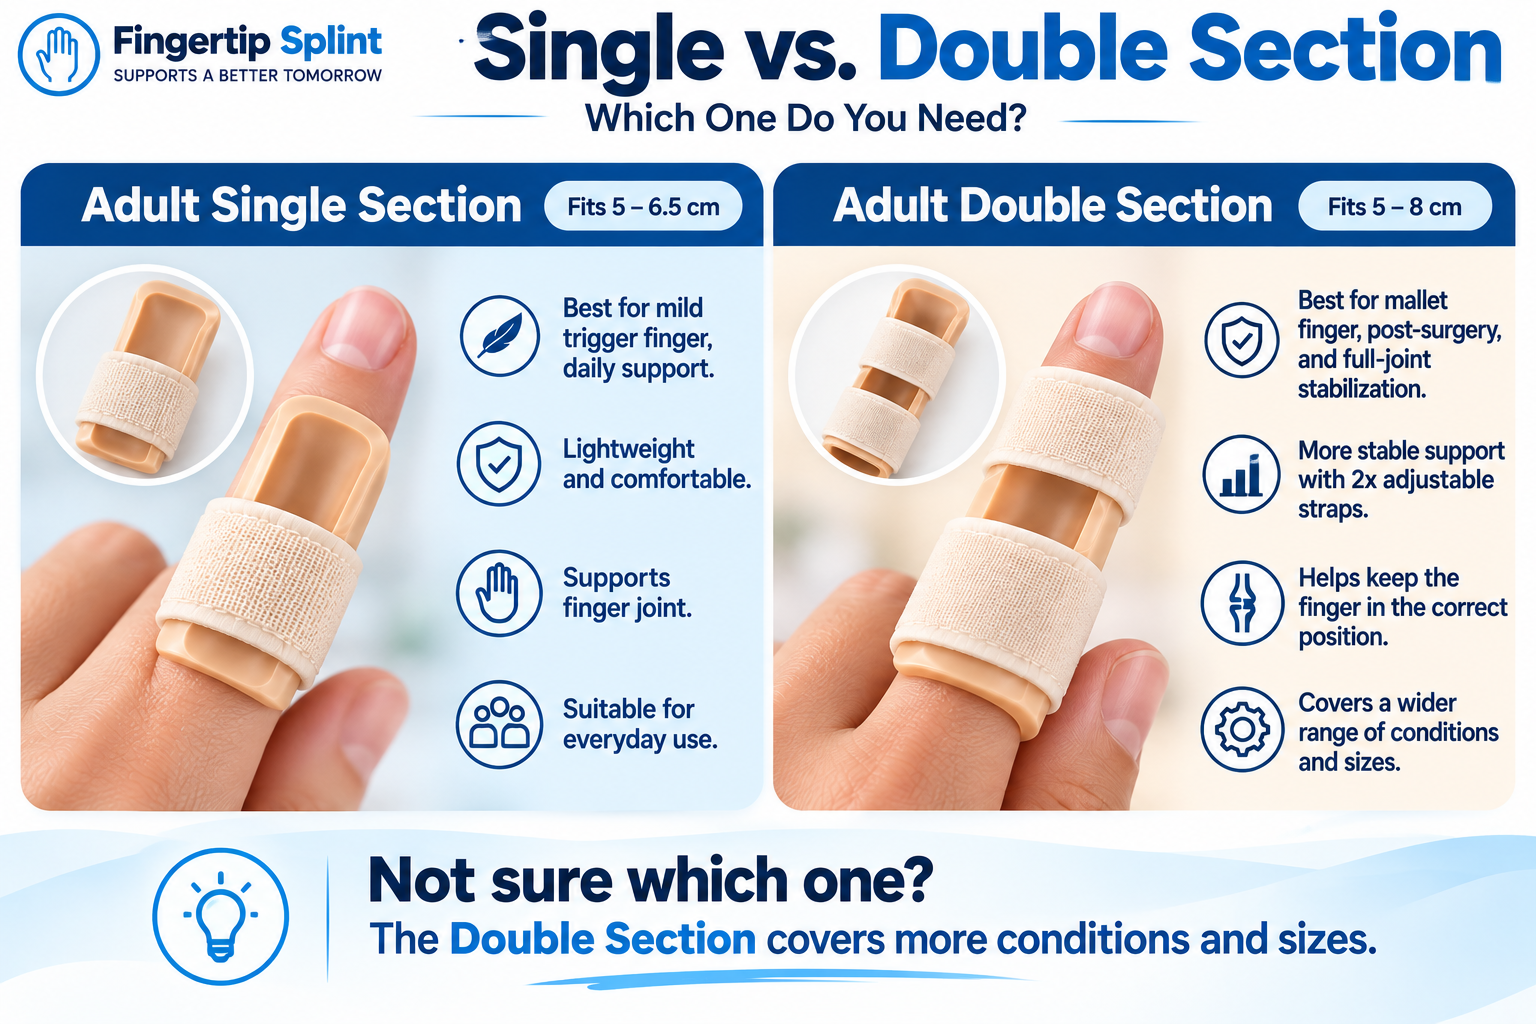
- Adjustable vs Fixed Designs
- Daytime vs Nighttime Use
- How to Put It On Correctly
- Recovery & Reassessment
- 10 Buying Mistakes
- Trigger Finger vs Mallet Finger
- Product Evaluation
- Doctor Advice
- Who Should Consider a Splint?
- Before You Click Buy
- 7 Quick Tips
- FAQ
What Makes a Trigger Finger Splint Different?
Trigger finger involves difficulty with smooth tendon movement. The Mayo Clinic trigger finger symptoms and causes page describes it as a condition in which the tendon does not glide smoothly through its surrounding sheath, producing stiffness, clicking, popping, catching, locking, and tenderness around the base of the finger.
Because the goal is not simply covering the finger, the design and positioning of a splint matter. A trigger finger splint is not a generic finger wrap. It is a support device that needs to match the affected finger, the intended support area, and the wearing situation. That is the bridge into the buyer guide that follows.
If you want the broader selection view first, our pillar article on the best trigger finger splint covers which type of support to consider. This article goes deeper on how to evaluate a specific product.
8 Features to Check Before Buying
This is the main body of the article. Each feature is something you can physically verify or ask about before you purchase.
Feature 1 — Correct Finger Compatibility
Check whether the product is designed for the index, middle, ring, or little finger, or for the thumb. Do not assume one universal design fits every digit equally well. Finger circumference, joint position, and functional demand differ. The buyer question is simple: does the product specifically accommodate the finger you need to support?
Feature 2 — Support Position
This is more important than simply saying “strong support.” Ask where the splint actually provides support. Consider finger alignment, joint positioning, tendon-related symptoms, the support area, and whether the design restricts particular movements. Avoid assuming that a specific splint “fixes” the tendon. Instead, inspect the mechanics of the product: where does it hold the finger, and how does that relate to your symptoms?
Feature 3 — Adjustability
Look at adjustable straps, hook-and-loop closure, multiple adjustment points, ease of application, and the ability to fine-tune the fit. But remember: adjustable does not mean wear it as tight as possible. The purpose is controlled, secure positioning, not maximum compression. A closure that cannot hold the fit during movement is not providing useful adjustability.
Feature 4 — Sizing
Wrong size leads to wrong fit, poor comfort, and poor positioning. The Cleveland Clinic finger splint resource specifically identifies skin problems and nerve impingement among potential complications of finger splints, which is why sizing is not a minor detail.
Too Loose
- Moves around
- Slips during activity
- Does not stay positioned
Appropriate Fit
- Secure
- Comfortable
- Provides intended support
- No excessive pressure
Too Tight
- Pressure or numbness
- Tingling
- Discoloration
- Increasing discomfort
Feature 5 — Material and Comfort
Do not simply look for “breathable material.” Ask the actual questions. Is the material comfortable against the skin? Are the edges smooth? Are there pressure points? Is padding present where needed? Can it be cleaned according to instructions? Does it become uncomfortable during extended wear? Could sweat or moisture affect comfort? A splint that is uncomfortable after twenty minutes will not be worn consistently, defeating its purpose.
Feature 6 — Closure System
Compare the main closure types. Hook-and-loop is easy to adjust. Elastic provides a flexible feel but is less customizable. Fixed structures may offer consistent positioning but less adjustment. Multi-strap designs allow more precise adjustment. Each has trade-offs. No single closure type is universally superior — it depends on your finger, your activity, and the support level you need.
Feature 7 — Mobility
A splint can support an area while limiting some movement, but the appropriate balance depends on why the splint is being used. The Cleveland Clinic finger splint overview explains that different finger splints have different designs and purposes, and the type needed depends on the condition. Do not assume that you should immobilize your finger completely.
Feature 8 — Intended Wearing Situation
Daytime
- Work and typing
- Cooking
- Driving
- Household tasks
- Gripping
Nighttime
- Comfort
- Positioning
- Sleep
- Strap security
- Skin pressure
Activity-specific
- Repetitive hand work
- Tools
- Sports
- Hobbies
- Musical instruments
The Mayo Clinic treatment guidance notes that repetitive gripping and grasping can aggravate trigger-finger symptoms and recommends reducing aggravating activities as part of conservative care.
3D Anatomy of a Trigger Finger Splint
Before you evaluate any product, it helps to know what you are looking at. The interactive 3D component explorer below breaks down the parts of a typical trigger finger splint. Click each component to see what it does and why it matters.
Trigger Finger Splint Component Explorer
Click a component to learn what it does and why it matters when you are buying.
Interactive Feature Explorer
Select a feature to see what to look for. This is a shopping decision tool, not a medical recommendation.
- Correct size for the intended finger
- Manufacturer sizing guidance followed exactly
- Secure positioning that does not slide
- Comfortable contact without pressure points
- Ability to fine-tune the closure
How Should a Trigger Finger Splint Fit?
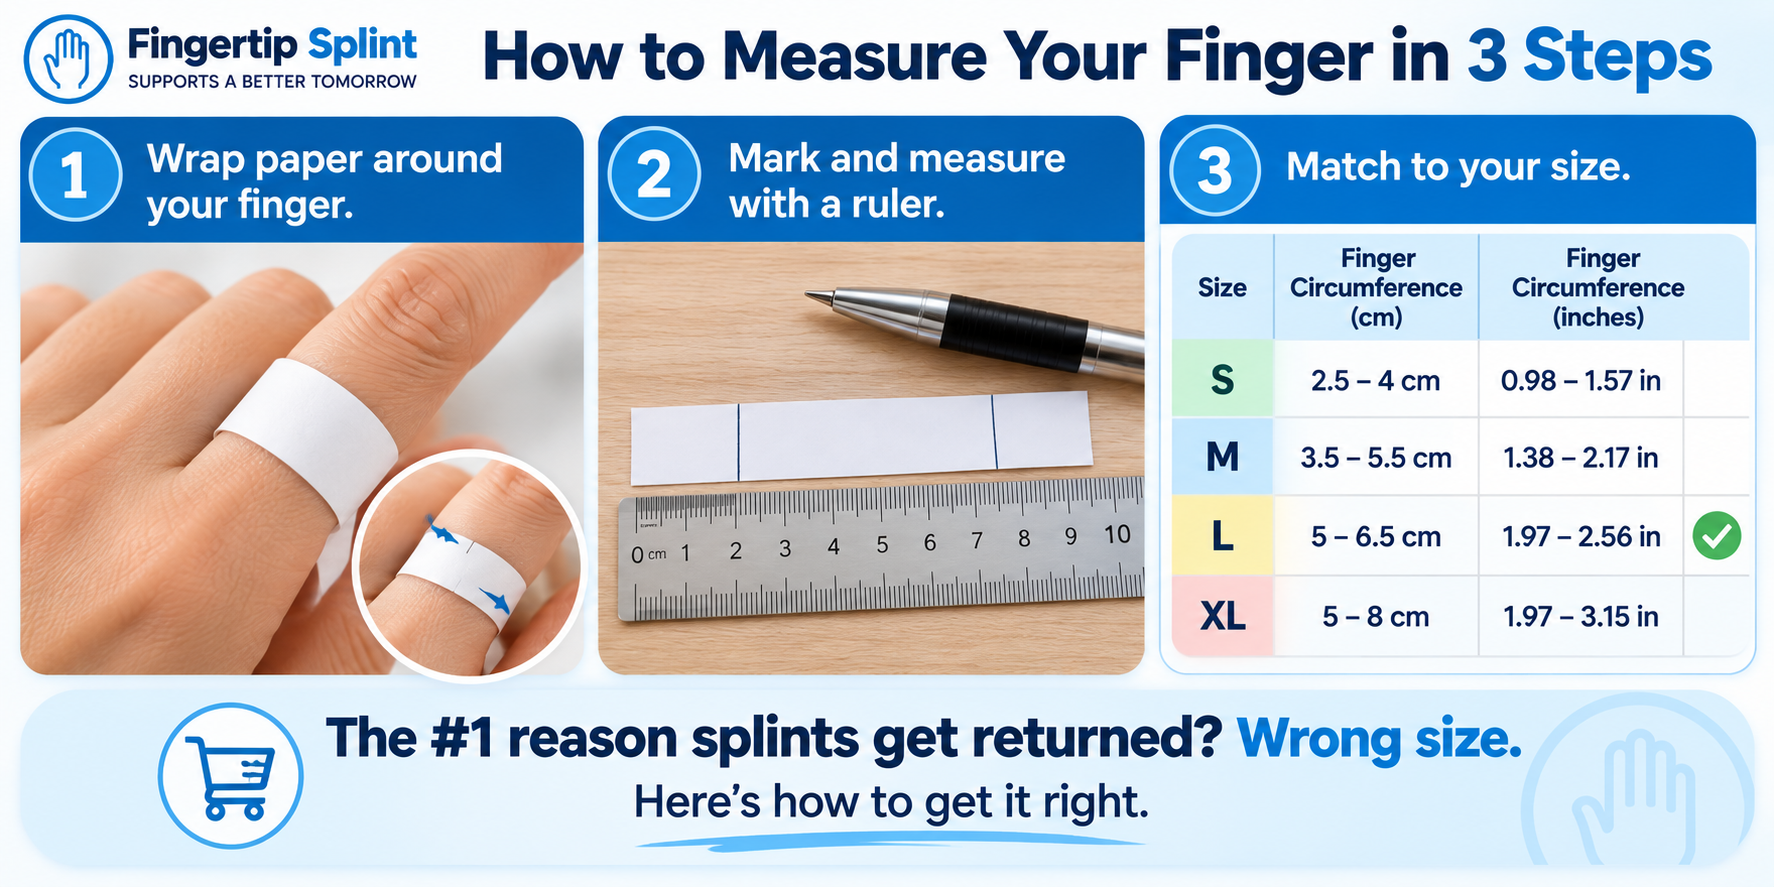
Fit is the single most common source of buyer frustration. Follow these eight steps and compare your measurement against the specific product’s size guidance.
Step 1 — Identify the correct finger
Index, middle, ring, little, or thumb. Each has a different circumference.
Step 2 — Read the manufacturer’s measuring instructions
Some ask for the base of the finger; others ask for the middle joint. The measurement point matters.
Step 3 — Measure according to the specified method
Use a flexible tape. Do not guess based on glove or ring size.
Step 4 — Select the corresponding size
Compare your measurement with the product’s size chart. If you are between sizes, follow the manufacturer’s guidance.
Step 5 — Position the splint according to instructions
Placement affects both comfort and support. Follow the product’s specific guidance.
Step 6 — Adjust gradually
Do not tighten the closure as much as possible right away. Increase tension in small steps.
Step 7 — Check movement and comfort
Open and close your hand. Check that the splint stays in place and does not create pressure points.
Step 8 — Recheck after wearing it for a period
Swelling and movement can change the fit. Recheck and readjust as needed.
Interactive Fit Checker
Click each item to check your fit. If you cannot confirm most of these, the fit needs adjustment.
Adjustable vs Fixed Trigger Finger Splints
Adjustability is not automatically superior. The right design depends on the intended purpose and instructions.
| Feature | Adjustable | Fixed / Structured |
|---|---|---|
| Fit customization | Higher | Lower |
| Ease of adjustment | Usually easier | Depends on design |
| Positioning | Adjustable | More predetermined |
| Comfort customization | Potentially easier | Depends on construction |
| Bulk | Varies | Varies |
| Everyday convenience | Depends on design | Depends on design |
Daytime vs Nighttime Trigger Finger Splint
When you wear a trigger finger splint affects how you evaluate it. The Cleveland Clinic trigger finger overview notes that providers commonly suggest nighttime splinting, while the Mayo Clinic treatment guidance describes splinting more broadly as a conservative treatment that can rest the tendon.
Daytime considerations
- Movement during work
- Gripping and lifting
- Comfort over hours
- Interference with tasks
Nighttime considerations
- Positioning during sleep
- Comfort over long hours
- Strap security
- Skin pressure
Step-by-Step: How to Put On a Trigger Finger Splint
Follow these eight steps for correct application, then recheck after several minutes of wear.
Trigger Finger Splint Recovery & Reassessment Timeline
This is a reassessment framework, not a promised week-by-week healing schedule. The Mayo Clinic treatment guidance notes that treatment varies according to severity and duration.
Stage 1 — Start
Focus on correct fit, correct positioning, and reducing aggravating activity. If symptoms are severe or persistent, seek professional assessment before relying on a splint alone.
Stage 2 — Monitor
Track clicking, catching, locking, morning stiffness, tenderness, and range of motion. Patterns matter more than single moments.
Stage 3 — Reassess
Ask whether symptoms are better, the same, or worse. Improvement should be meaningful, not imagined.
Stage 4 — Professional Review
If symptoms remain significant, worsen, or interfere with normal use, seek evaluation.
Stage 5 — Activity Progression
Return to normal activities according to symptoms, product instructions, and professional guidance.
10 Buying Mistakes to Avoid
A generic size label will not help. Use the specific product’s chart.
A splint can look supportive without matching your finger or joint.
Excessive pressure can cause numbness, tingling, or discoloration. It does not improve support.
More restriction is not automatically better. Match the support to the situation.
A finger splint is not interchangeable with a thumb splint. Confirm the intended digit.
A splint can cover the finger without supporting the area you need supported.
A splint that interferes with your work or hobbies will not be worn consistently.
Trigger and mallet finger are different conditions with different support designs. See our trigger and mallet finger splint guide.
These are warning signs, not signs that the splint is working.
Severe symptoms require professional evaluation, not a stronger splint.
Trigger Finger vs Mallet Finger: Quick Comparison
These two conditions are sometimes confused, but they involve different mechanisms and different support designs. Buying the wrong type of splint will not address the underlying problem.
| Feature | Trigger Finger | Mallet Finger |
|---|---|---|
| Main issue | Catching or locking | Difficulty extending fingertip |
| Typical mechanism | Tendon or pulley problem | Extensor mechanism injury |
| Support objective | Depends on treatment | Specific positioning may be required |
| Splint type | Trigger-focused design | Often different design |
| Professional assessment | Important when symptoms persist or are severe | Particularly important with injury |
If you are not sure which condition applies to your situation, see our detailed finger splint for trigger and mallet finger guide, and consider professional assessment before buying.
How to Evaluate This Trigger Finger Splint Before Buying
Use this section as a worked example of how to evaluate any trigger finger splint against the criteria in this guide. The product being evaluated is the trigger finger splint from FingerTipSplint.
1PCS Finger Splints Trigger Finger Splint Mallet
- Finger compatibility: Designed for finger support with options for trigger and mallet finger applications
- Fit: Check the product page for the specific size chart
- Support: Support structure intended to help maintain the intended finger position
- Adjustable: Adjustable closure for fine fit tuning
- Comfortable: Cushioned contact surface intended for extended wear
- Mobility: Designed to preserve useful finger movement where appropriate
- Intended use: Daily and nighttime support as recommended
- Care: Follow the manufacturer’s cleaning instructions
Rather than judging a splint by appearance alone, compare its actual construction, adjustment system, fit, support, and intended use against the criteria in this guide. For additional questions, visit the finger splint frequently asked questions, and for wholesale inquiries, use the request a finger splint quote page.
| Buyer Question | What to Examine |
|---|---|
| Correct finger? | Product compatibility |
| Fit? | Size and adjustment information |
| Support? | Design and positioning |
| Adjustable? | Closure and strap system |
| Comfortable? | Materials and contact areas |
| Mobility? | Movement permitted |
| Intended use? | Manufacturer guidance |
| Care? | Cleaning and maintenance instructions |
What a Doctor or Hand Specialist Would Want You to Check
This section is written in the tone of a practical professional checklist. It is not a diagnosis and does not replace an in-person assessment.
Which finger is affected?
Different fingers have different sizing and functional demands.
How long have symptoms been present?
Recent onset differs from chronic.
Frequency of clicking or catching
How often does it happen, and does it resolve on its own?
Whether locking occurs
Does the finger lock, and can it be straightened?
Whether the finger can fully straighten
Ability to straighten matters for assessment.
Tenderness
Where exactly is the tenderness located?
Swelling
Significant swelling may indicate a more serious injury.
Previous injuries
A history of injury may change the assessment.
Repetitive activities
What does the person do with their hands day to day?
Impact on work
Functional impact matters for management decisions.
Response to previous treatment
Has the person tried other approaches already?
Whether symptoms fit trigger finger
Not every finger-locking problem is trigger finger.
The Mayo Clinic diagnosis and treatment guidance notes that diagnosis involves physical examination and observing finger movement, pain, smoothness of motion, and locking. Additional trusted resources include the AAOS OrthoInfo trigger finger page, the MedlinePlus trigger finger resource, the NHS trigger finger page, the WebMD trigger finger overview, and the Healthline trigger finger resource.
Who Should Consider a Trigger Finger Splint?
A trigger finger splint may be relevant for people who have been advised to use a splint, have a known trigger finger diagnosis, are researching conservative support, want to compare splint features, or need help understanding sizing and fit.
- Severe pain
- Sudden loss of movement
- Significant swelling
- Deformity
- Numbness
- Major discoloration
- Worsening symptoms
- Persistent locking
The Cleveland Clinic trigger finger resource advises evaluation when finger or thumb movement is reduced and urgent attention when someone suddenly cannot move or use a digit.
Before You Click Buy
Click each item to confirm. Aim to check all 10 before ordering.
7 Quick Tips Before You Buy
Frequently Asked Questions
Identify the correct finger, read the manufacturer’s measuring instructions, measure according to the specified method, and compare your measurement with the product’s size chart. A correct size should be secure and comfortable, not excessively tight. Watch for warning signs such as numbness, tingling, discoloration, or increasing discomfort.
Look for correct finger compatibility, appropriate support position, adjustable closure, clear sizing guidance, comfortable materials, a suitable closure system, appropriate mobility for your activities, and clear manufacturer instructions for wearing and care.
It should be secure and comfortable, not excessively tight. You should be able to wear it for the intended period without numbness, tingling, significant discoloration, or increasing pain. If concerning symptoms occur, remove the splint and seek appropriate advice rather than simply tightening or continuing to wear it.
The appropriate schedule depends on the individual’s situation and clinical guidance. The Cleveland Clinic trigger finger overview notes that providers commonly suggest nighttime splinting, while the Mayo Clinic describes splinting more broadly as a conservative treatment. Follow your healthcare professional’s advice on wearing schedule.
These conditions involve different problems and support requirements. Trigger finger involves tendon gliding and catching, while mallet finger involves the extensor mechanism at the fingertip. Using the wrong type of splint will not address the underlying problem. See our detailed guide for the differences.
There is no universal timeline. Duration depends on your situation, the device instructions, and professional advice where necessary. Do not assume that comfort equals recovery. If symptoms persist, worsen, or involve locking, weakness, or loss of function, seek professional assessment.
Seek medical advice if you have numbness, discoloration, severe pressure, worsening symptoms, loss of movement, or persistent locking. The Cleveland Clinic advises evaluation when finger or thumb movement is reduced and urgent attention when someone suddenly cannot move or use a digit.
Choose Your Trigger Finger Support With Confidence
Before ordering, check the finger, size, support position, adjustability, comfort, mobility, and intended use. If the product matches those requirements, you can review its specifications and decide whether it fits your needs.
Evaluate the 1PCS Finger Splints Trigger Finger Splint Mallet against the criteria in this guide. For more information first, revisit the broader trigger finger support guide, explore finger splint options, or check the finger splint frequently asked questions. For wholesale or business inquiries, use the request a finger splint quote page.
View the Product Explore Finger SupportConclusion: Check the Fit Before You Commit
The right trigger finger splint is the one that fits, supports the intended area, and can actually be worn during the activities you do. A premium product in the wrong size or with the wrong support level will underperform a simpler product that matches your needs. Before you buy, measure the specific finger, check the manufacturer’s sizing guidance, confirm the support position and adjustability, and verify that the splint stays comfortable during the intended wearing period.
If symptoms persist, worsen, or involve locking, deformity, severe pain, numbness, or loss of function, do not simply buy a stronger splint. Seek appropriate medical evaluation. For medical finger splint supply and distribution, see the medical finger splint supplier page and the finger splint distributor page. For the full FingerTipSplint range, visit the FingerTipSplint homepage.