
Carpal Tunnel Wrist Brace Buying Guide: Fit, Features & Support
You already know you need wrist support. What you don’t know is how tight it should be, whether it should cover your thumb, whether rigid beats flexible, or how to size it without guessing. This guide answers those practical questions before you buy.
Inside this guide you’ll find a 3D interactive brace component breakdown, a fit checker, a sizing walkthrough, a rigid-versus-flexible comparison, a symptom-tracking timeline, and a practical product evaluation — so you can choose a carpal tunnel wrist brace from our shop with confidence rather than guesswork.
What a Wrist Brace Can—and Cannot—Do
A properly selected wrist splint can help maintain a more neutral wrist position and may reduce aggravating wrist positioning, particularly during sleep. That is the honest, evidence-aligned role of a brace. It is a positioning tool, not a diagnostic device and not a cure.
It cannot confirm that you have carpal tunnel syndrome, identify the underlying cause of your symptoms, guarantee symptom resolution, or replace professional evaluation when symptoms are persistent or severe. According to Mayo Clinic’s carpal tunnel treatment guidance, nighttime wrist splinting is a nonsurgical option that may ease nighttime tingling and numbness, especially when symptoms are mild or moderate. The NHS carpal tunnel syndrome page similarly frames splints as a first-line conservative measure.
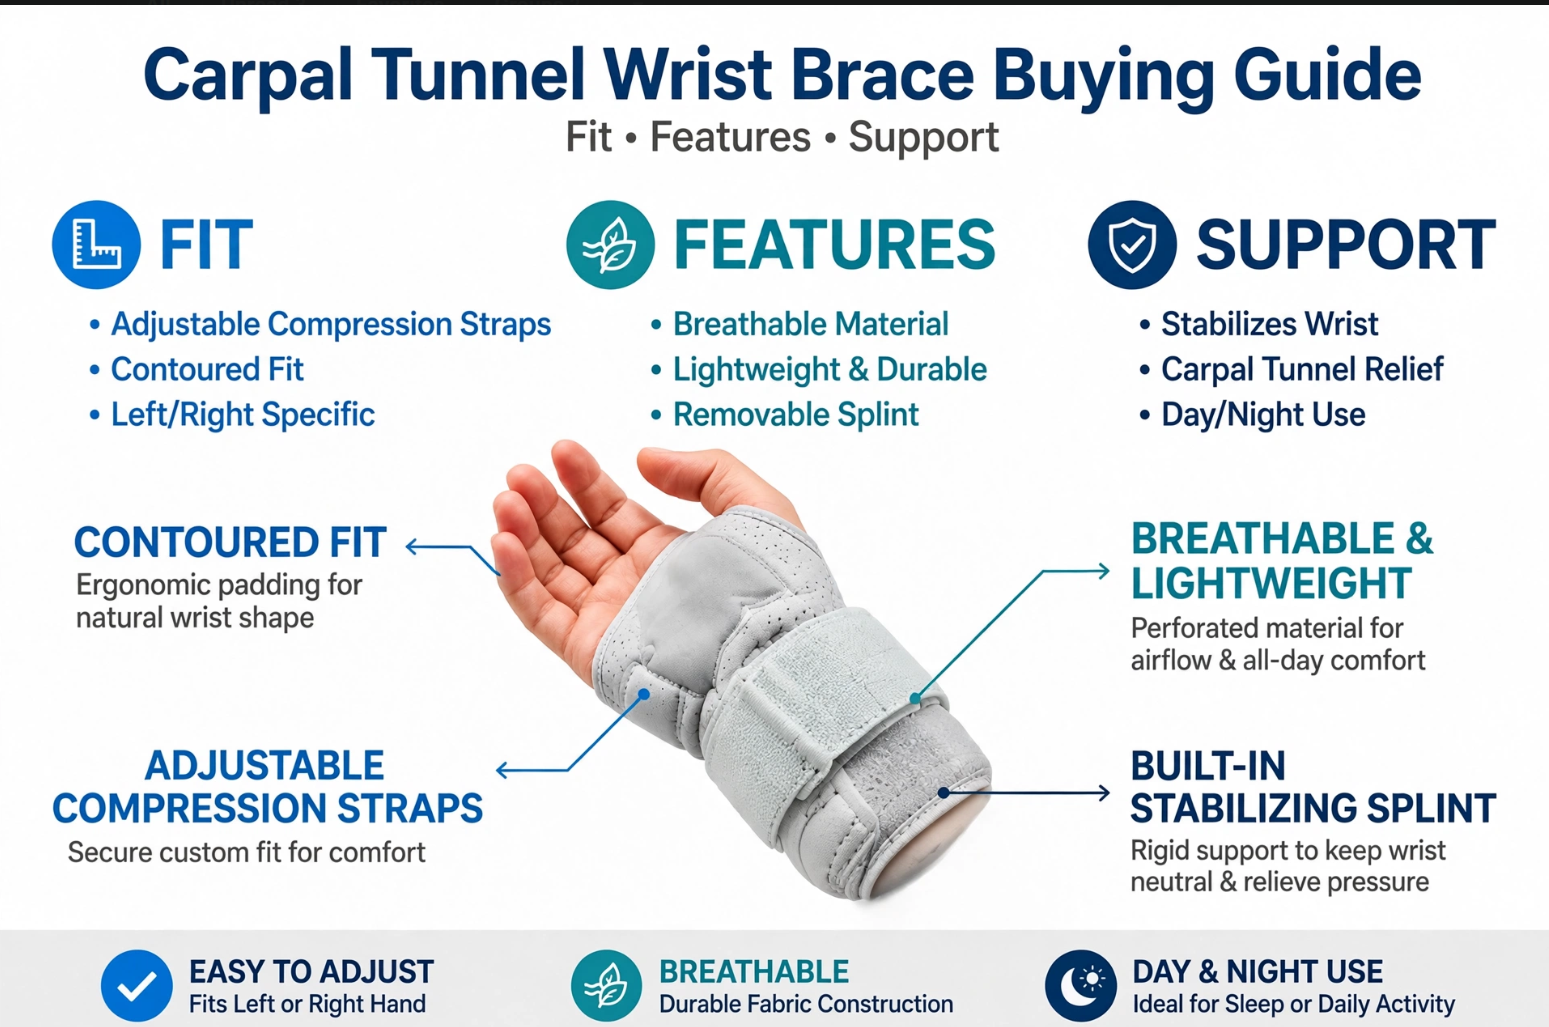
Look for a carpal tunnel wrist brace that holds the wrist in a neutral position, matches your measured wrist circumference to the manufacturer’s size chart, uses adjustable fastening, keeps fingers mobile, feels snug rather than tight, and suits your intended wearing schedule. Support should be appropriate, not excessive.
Table of Contents
- What a Brace Can and Cannot Do
- Why the Wrong Brace Feels Worse
- Neutral Wrist Position Explained
- 3D Inside a Wrist Brace
- 10 Features to Check
- How to Measure Your Wrist
- How Tight Should It Be?
- Rigid vs Flexible Support
- Support vs Compression
- Nighttime vs Daytime Use
- How to Put It On Correctly
- What to Monitor Over Time
- 10 Common Buying Mistakes
- Who May Benefit
- When a Brace May Not Be Enough
- Product Evaluation
- Doctor Advice
- Which Features Matter Most?
- 7 Fast Buying Tips
- FAQ
Why the Wrong Wrist Brace Can Feel Worse
The most common mistake buyers make is assuming that all wrist supports are equivalent. They are not. A wrist sleeve, a compression wrap, a rigid splint, and a carpal-tunnel-oriented wrist brace can have entirely different purposes. Choosing the wrong category for your problem is the fastest way to waste money and still feel uncomfortable.
Problem 1: Too Much Pressure
A brace that is excessively tight can become uncomfortable and may create pressure points that worsen symptoms. Mayo Clinic’s guidance is direct: a nighttime wrist splint should be snug, not tight. Tightness is not a sign of effectiveness. It is often a sign of poor fit.
Problem 2: Poor Position
A brace may look supportive but fail to hold the wrist in the intended neutral position. This is especially common with generic sleeves that provide compression but no positional structure. The AAOS carpal tunnel syndrome patient resource describes nighttime bracing as a way of keeping the wrist neutral and preventing irritation associated with curling the wrist during sleep.
Problem 3: Wrong Size
Even a well-designed brace performs poorly if the size is wrong. A brace that is slightly too large will slide, rotate, and lose positional control. A brace that is slightly too small will create pressure points and be intolerable overnight.
Problem 4: Too Much Restriction
A highly restrictive brace may interfere with necessary hand movement. An NHS occupational therapy carpal tunnel leaflet advises that a wrist splint should limit wrist movement without unnecessarily restricting thumb or finger movement.
Problem 5: Wrong Purpose
A compression sleeve is not necessarily equivalent to a positioning splint. If your goal is wrist-position control, a compression-only product may not deliver what you need. If your goal is light support and warmth, a rigid splint may be overkill.
Why Neutral Wrist Position Matters
The carpal tunnel is a narrow passage through which the median nerve and tendons travel. According to Mayo Clinic’s carpal tunnel syndrome overview, compression of the median nerve can produce symptoms such as numbness, tingling, and weakness. Wrist position directly influences the pressure inside that tunnel.
When the wrist is held in a neutral position — roughly straight, not bent forward or backward — pressure on the median nerve is generally lower than when the wrist is held in prolonged flexion or extension. This is why a brace is designed to control wrist movement rather than simply wrap the wrist. The goal is positional control, not total immobilization.
For a broader comparison of brace designs before you commit, our guide on what to look for in a carpal tunnel wrist brace provides a feature-by-feature buying framework that complements this fit-focused guide.
Inside a Carpal Tunnel Wrist Brace
Before you evaluate any product, it helps to know what you are looking at. The interactive 3D component explorer below breaks down the typical layers and features of a wrist brace. Click each component to see what it does and why it matters.
3D Brace Component Explorer
Click a component to learn what it does and why it matters when you are buying.
10 Features Buyers Should Check Before Buying
This is the core buyer section. Each feature below is something you can physically verify or ask about before you purchase. Use the interactive checklist at the end to score any brace against these criteria.
Feature 1 — Neutral Position Support
The brace should be designed to help limit excessive wrist bending. Look at the support insert and the overall structure. A brace that only wraps the wrist without any positional element is a compression product, not a positioning splint. If your goal is to keep the wrist neutral during sleep, this is the single most important feature.
Feature 2 — Adjustable Closure
Hook-and-loop straps allow you to set the circumference to your wrist. Multiple fastening points are better than one, because they let you fine-tune pressure. Fit changes the wearing experience more than almost any other factor. A brace with adjustable closure can work for a range of wrist sizes; a brace with a single fixed strap cannot.
Feature 3 — Correct Sizing System
Some brands size by wrist circumference, some by hand circumference, some by palm measurement, and some by product-specific charts. The NHS patient information leaflet advises measuring around the wrist and checking each supplier’s sizing method, because sizing systems can differ. Never assume that “medium” means the same thing across brands.
Feature 4 — Support Insert
Inserts may be metal, plastic, semi-rigid, or flexible. Do not automatically describe metal as superior. The important question is what the insert is designed to accomplish. A semi-rigid insert may be ideal for nighttime neutral positioning while a fully rigid insert may be overkill for daytime use.
Feature 5 — Finger Mobility
A suitable wrist brace generally should not unnecessarily immobilize the fingers unless its intended design specifically requires it. Finger mobility affects whether you can wear the brace during daily activities. The NHS occupational therapy leaflet notes that a carpal tunnel wrist splint should limit wrist movement without unnecessarily restricting thumb or finger movement.
Feature 6 — Thumb Opening
Thumb freedom affects gripping, typing, phone use, dressing, and household tasks. A brace that traps the thumb may be fine for overnight use but impractical during the day. If you need to wear the brace while working, check the thumb opening carefully.
Feature 7 — Material
Consider breathable fabric, neoprene, padded material, moisture management, heat retention, and skin contact. Avoid claiming that one material is automatically medically superior. The right material is the one that keeps you comfortable for your intended wearing period without causing skin irritation.
Feature 8 — Edge Construction
Poorly finished edges can create rubbing or pressure points. Run your finger along the edge before buying. If you are ordering online, look for reviews that mention edge comfort, especially for overnight use.
Feature 9 — Ease of Adjustment
Ask yourself: can you put it on correctly without struggling with the straps? This is especially relevant for nighttime use, when you may be adjusting the brace in low light or while half asleep. A brace that is difficult to secure will not be worn consistently.
Feature 10 — Care and Maintenance
Consider washing, drying, support insert care, odor control, and material longevity. Product-specific instructions must take priority over generic advice. A brace you cannot maintain hygienically will not be worn long-term.
Choosing Between Brace Types
If you are comparing different brace designs before buying, our guide on best wrist brace for carpal tunnel support provides a broader feature-by-feature framework. For readers primarily concerned with straps, adjustability, and everyday movement, see our guide to choosing an adjustable wrist brace for daily support.
Check the Brace Before You Buy
Click each item to confirm you have checked it. If you cannot answer several of these questions, do not buy based only on appearance or price.
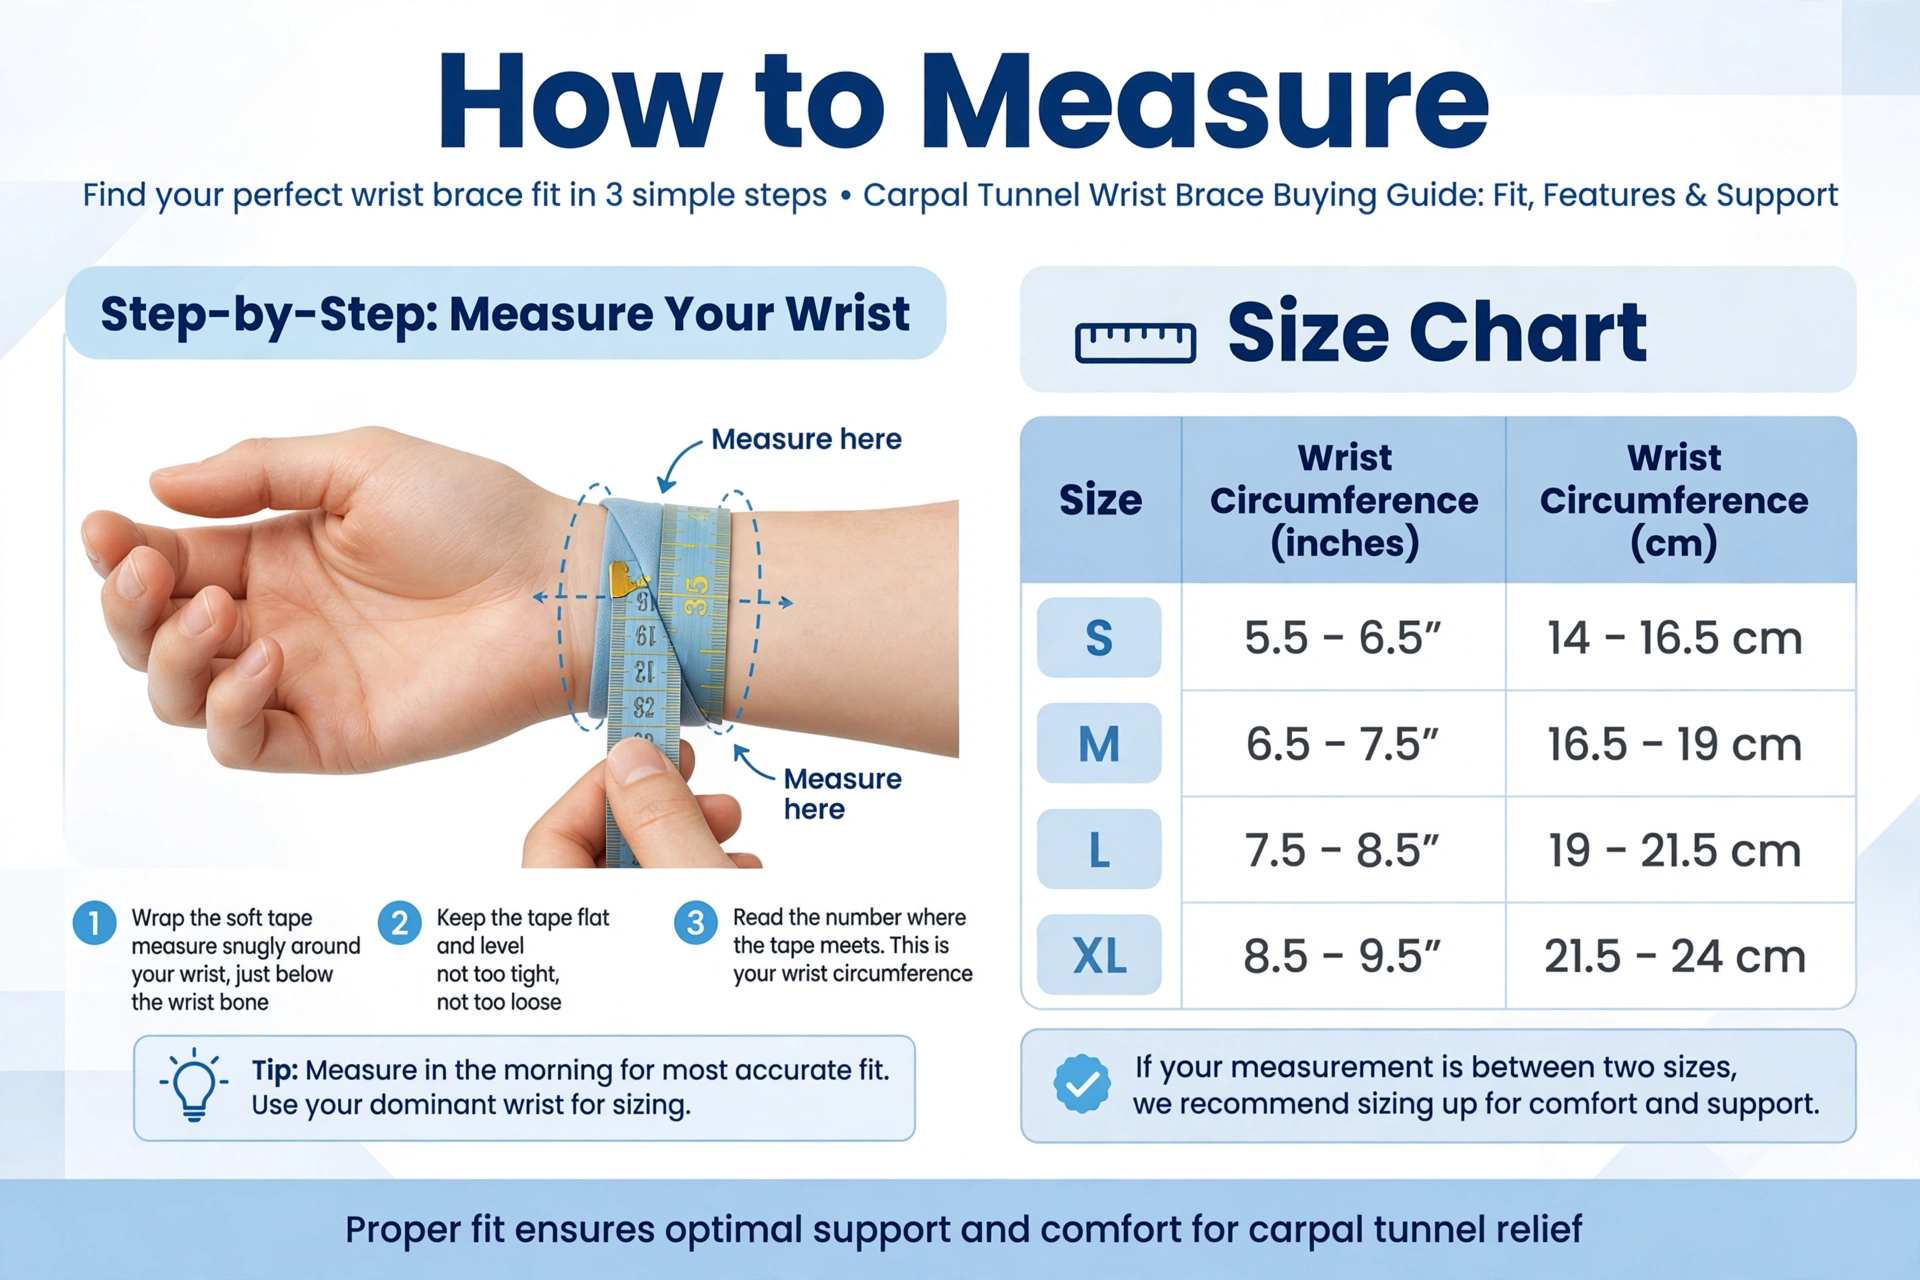
How to Measure Your Wrist: Step-by-Step
Sizing is the single most common source of buyer frustration. This five-step method follows the approach described in the NHS carpal tunnel leaflet: measure around the wrist, record the number, and compare it with the specific manufacturer’s chart.
Step 1 — Use a flexible measuring tape
A cloth tape is ideal. If you only have a rigid tape, wrap a strip of paper around your wrist, mark it, and measure the paper with a ruler.
Step 2 — Wrap it around the wrist
Follow the manufacturer’s measurement instructions. Some ask for the wrist just below the palm; others ask for the palm itself. The point matters.
Step 3 — Record the measurement
Write it down. Do not rely on memory, especially if you are comparing multiple products.
Step 4 — Compare with the product’s size chart
Each brand’s chart is different. Never assume a universal small, medium, or large.
Step 5 — If you are between sizes, follow the manufacturer’s guidance
Some brands advise sizing up for overnight comfort; others advise sizing down for positional control. The manufacturer’s instruction takes priority.
How Tight Should a Carpal Tunnel Wrist Brace Be?
The answer is simple to state and surprisingly hard to judge: snug, not tight. A good fit is secure, stable, and comfortable, and it does not slide excessively during the night. A poor fit creates excessive pressure, persistent rubbing, numbness, tingling that worsens after wearing, concerning discoloration, or pain caused by the brace itself.
Good fit indicators
- Secure and stable
- Comfortable for the intended period
- Does not slide excessively
- Fingers remain mobile
- Skin looks normal after removal
Poor fit warning signs
- Excessive pressure
- Persistent rubbing or pressure points
- Numbness or tingling that worsens after wearing
- Concerning discoloration
- Pain caused by the brace itself
Rigid vs Flexible Wrist Brace: Which Is Right for You?
Neither design should be called universally “best.” The appropriate design depends on intended use and individual circumstances. The table below compares the two broad categories across the factors that matter most to buyers.
| Characteristic | More Structured Brace | Flexible Brace |
|---|---|---|
| Movement control | Greater potential | More freedom |
| Flexibility | Lower | Higher |
| Bulk | Potentially greater | Often lower |
| Daily activities | May be restrictive | Usually easier |
| Nighttime use | Depends on comfort and design | Depends on support |
| Position control | More pronounced | More limited |
| Best question to ask | “Do I need stronger movement control?” | “Do I prioritize flexibility?” |
Support vs Compression: Is a Compression Sleeve Enough?
This is one of the most important distinctions for a confused buyer. Compression-focused support primarily provides close fit, pressure, warmth, and light support. A positioning-focused splint primarily provides wrist-position control and movement limitation. If your problem is wrist position during sleep, a compression sleeve may not address it. If your problem is mild discomfort and you want light support during the day, a rigid splint may be more than you need.
Identify the actual goal before selecting a product. The WebMD carpal tunnel treatment overview discusses splinting as a conservative option alongside other approaches, and Healthline’s carpal tunnel syndrome resource covers symptom patterns that help you understand whether your issue is primarily positional or primarily activity-related.
Nighttime vs Daytime: When Is a Brace Usually Worn?
Current guidance commonly emphasizes nighttime use. The NHS says wrist splints are worn while sleeping to help keep the wrist straight, while Mayo Clinic recommends snug nighttime splinting as a nonsurgical measure. AAOS notes that splints may also be used during activities that aggravate symptoms.
Nighttime priorities
- Comfort over long hours
- Neutral positioning
- Low pressure
- Secure fit that does not slide
- Breathable construction
Daytime considerations
- Keyboard use
- Driving
- Gripping and lifting
- Phone use
- Household activities
How to Put On a Wrist Brace Correctly
Follow these five steps, then do a final check. The goal is a secure fit without excessive tightness and with functional finger movement.
If you need help choosing between adjustable designs for daily use, see our guide on how to choose an adjustable wrist brace for daily support.
Carpal Tunnel Wrist Brace: What to Monitor Over Time
This is a symptom-tracking framework, not a promise of healing. Response varies. The purpose of tracking is to know whether the brace is helping and when to seek further assessment.
First Few Nights
Monitor comfort, nighttime symptoms, whether the brace stays positioned, and how your skin responds. If the brace is intolerable, adjust the fit or reconsider the design.
Week 1–2
Record nighttime waking, numbness, tingling, morning symptoms, and any daytime changes. Patterns matter more than single nights.
Week 3–6
Ask whether there is meaningful improvement, whether symptoms are still recurring, whether numbness is becoming persistent, and whether hand strength is changing. The NHS notes that some people may need to wear a splint for up to six weeks before noticing improvement.
After the Trial
If symptoms persist, worsen, or involve weakness, do not simply move to a tighter brace. Seek appropriate medical evaluation.
10 Carpal Tunnel Wrist Brace Mistakes to Avoid
A brace can look supportive without providing the right positional control. Look at the structure, not the marketing photo.
Check: is there a support insert?
Sizing charts vary. A medium in one brand may be a large in another.
Check: did you measure your wrist?
Snug is not the same as tight. Excessive pressure can create new symptoms.
Check: can you slip a finger under the edge?
More restriction is not automatically more appropriate. Match the design to your use.
Check: does the design match your goal?
The wrist can be supported while preserving useful hand mobility.
Check: can you open and close your hand?
Different designs serve different purposes. A sleeve is not a splint.
Check: does it control position?
A brace that is intolerable will not be useful for its intended wearing schedule.
Check: could you sleep in it?
Persistent symptoms deserve evaluation, not endless self-treatment.
Check: is there a review date?
Check skin regularly. Redness, itching, or breakdown means the brace needs adjustment or replacement.
Check: is your skin normal after removal?
A brace is a support tool. It does not replace assessment.
Check: is your expectation realistic?
Who May Benefit From a Carpal Tunnel Wrist Brace?
These symptoms can occur with carpal tunnel syndrome but may have other causes. A brace may be relevant to people who have a professionally diagnosed mild or moderate case, experience symptoms predominantly at night, notice symptoms with wrist positioning, want a non-invasive support option, or need temporary positional support.
Do not conclude that you have carpal tunnel syndrome based on symptoms alone. The Mayo Clinic symptoms and causes page and the NIAMS carpal tunnel syndrome overview both describe the range of causes and the importance of proper assessment.
When a Brace May Not Be Enough
- Numbness is persistent
- Weakness is increasing
- Grip is deteriorating
- Symptoms are getting worse
- Symptoms are not improving
- The diagnosis is uncertain
- There is significant muscle wasting
- The brace itself causes concerning symptoms
AAOS identifies persistent symptoms and weakness or muscle wasting as reasons for further evaluation. The AAOS plain language summary and the Mayo Clinic diagnosis and treatment page both provide useful guidance on when to escalate care.
Product Evaluation: 1PCS Wrist Brace Carpal Tunnel Support
Use this section as a worked example of how to evaluate any brace against the criteria in this guide. The product being evaluated is the adjustable wrist brace for carpal tunnel support from FingerTipSplint.
1PCS Wrist Brace Carpal Tunnel Support
- Fit: Designed for a range of wrist sizes with adjustable closure
- Adjustability: Hook-and-loop fastening allows fine-tuning of pressure
- Support structure: Includes a support element intended to help maintain neutral wrist position
- Wrist coverage: Covers the wrist and lower palm area
- Finger mobility: Finger opening keeps fingers free for daily tasks
- Material: Breathable construction intended for extended wear
- Intended use: Nighttime neutral positioning and light daytime support
- Ease of fastening: Adjustable straps designed for straightforward application
- Care: Follow the manufacturer’s cleaning instructions
When evaluating this or any other product, compare it against the 10 features above. If a product does not clearly state its support structure, sizing method, or care instructions, ask before buying. For wholesale or business inquiries, FingerTipSplint offers a request-a-quote page, and for medical finger splint supply, see the medical finger splint supplier page.
What Would a Hand Specialist Want You to Check?
This section is written in the tone of a practical professional checklist. It is not a diagnosis and does not replace an in-person assessment.
1. Is the diagnosis clear?
Not every hand or wrist symptom is carpal tunnel syndrome. Other conditions can produce similar numbness, tingling, or weakness.
2. Is the brace maintaining appropriate positioning?
A brace that does not hold the wrist in a neutral position is not doing its job, regardless of how it looks.
3. Is it fitted correctly?
Fit is measurable. Check circumference, strap pressure, and skin response after wearing.
4. Is it tolerable overnight?
If you cannot sleep in it, it will not be worn consistently enough to matter.
5. Are symptoms improving?
Track symptoms over weeks, not hours. Improvement should be meaningful, not imagined.
6. Are there warning signs?
Persistent numbness, weakness, or muscle wasting should not be managed indefinitely with increasingly restrictive braces.
Additional trusted resources include the Cleveland Clinic carpal tunnel syndrome overview, Johns Hopkins Medicine carpal tunnel syndrome page, MedlinePlus carpal tunnel syndrome resource, and the British Society for Surgery of the Hand patient information.
Which Brace Features Matter Most to You?
Select your primary priority and we’ll show you what to look for. This is the same decision framework a specialist would use when recommending a brace type.
- Soft interior and padded comfort layer
- Secure but non-tight fit
- Low pressure across the wrist
- Appropriate neutral wrist positioning
- Breathable construction for long wear
7 Fast Buying Tips
Frequently Asked Questions
A suitable design generally emphasizes appropriate wrist positioning and fit, but there is no universal brace for every person. The right choice depends on your symptoms, your wrist measurement, whether you need nighttime or daytime support, and whether your priority is positional control, adjustability, or comfort. Compare any brace against the 10 features in this guide before buying.
Your wrist brace should generally feel secure and snug without creating excessive pressure. Mayo Clinic advises that a nighttime splint should be snug, not tight. If you experience numbness, tingling that worsens after wearing, discoloration, or pain caused by the brace itself, the fit is too tight or the design is wrong for you.
No. The goal is movement control, not total immobilization. The NHS occupational therapy leaflet advises that a wrist splint should limit wrist movement without unnecessarily restricting thumb or finger movement. A brace that locks the entire hand is usually not appropriate for carpal tunnel support unless specifically designed for that purpose.
Nighttime use is common and is emphasized in current guidance. The NHS says wrist splints are worn while sleeping to help keep the wrist straight, and Mayo Clinic recommends snug nighttime splinting as a nonsurgical measure for mild to moderate symptoms. If you cannot tolerate the brace overnight, adjust the fit or consider a different design.
Measure your wrist circumference using a flexible measuring tape, following the manufacturer’s specific instructions. Then compare your measurement with that product’s size chart. Sizing systems differ between brands, so never assume that a medium in one brand matches a medium in another. If you are between sizes, follow the manufacturer’s guidance.
Use depends on your activity and individual circumstances. AAOS notes that splints may also be used during activities that aggravate symptoms. If you need daytime support, look for a brace with finger and thumb freedom, low bulk, and easy fastening. Do not assume that all-day wear is necessary for everyone.
Response varies. The NHS notes that some people may need to wear a splint for up to six weeks before noticing improvement. If symptoms persist, worsen, or involve weakness, numbness that is becoming persistent, or muscle wasting, seek professional assessment rather than continuing to self-treat with increasingly restrictive braces.
Choose Your Wrist Brace With Confidence
Still unsure whether you are choosing the right size, support level, or design? Compare any brace against the practical criteria in this guide: positioning, fit, adjustability, comfort, and mobility.
Explore the 1PCS Wrist Brace Carpal Tunnel Support and evaluate it against the 10 features above. For additional questions, visit the FingerTipSplint FAQ. For wholesale or business inquiries, use the request-a-quote page.
View the Product Browse All Wrist SupportConclusion: Fit Beats Features Every Time
The brace that works is the brace that fits, positions the wrist appropriately, and can actually be worn for the intended period. A premium product in the wrong size will underperform a simpler product in the right size. Before you buy, measure your wrist, check the manufacturer’s sizing chart, confirm the support structure, and verify that your fingers can still move. If symptoms persist, worsen, or involve weakness, do not simply move to a tighter brace — seek appropriate medical evaluation.
For more buying guidance, explore the FingerTipSplint blog and the FingerTipSplint FAQ. For medical finger splint supply and distribution, see the medical finger splint supplier page and the finger splint distributor page.