
Finger Brace Fit Guide: Understanding Adjustability and Coverage
A finger brace can have useful features on paper, but those features matter less if the brace slides out of position, bunches up, leaves important areas uncovered, or feels excessively tight. This guide teaches you how to evaluate fit correctly — how adjustability actually changes positioning, how to check coverage, and how to find the balance between secure placement, comfort, and appropriate movement.
What This Guide Covers
- Quick Answer
- What “Good Fit” Actually Means
- Fit vs Size
- Understanding Adjustability
- Coverage: What It Actually Means
- Coverage vs Movement
- The 5-Step Fit Process
- The Three Fit Zones
- How to Check Coverage
- Finger Shape and Individual Fit
- Adjustability and Coverage Together
- Fit During Everyday Activities
- Common Fit Problems
- Adjustable vs Fixed Fit
- How to Measure Before Buying
- Does My Brace Fit? Interactive Check
- 3D Interactive: Correct Fit Anatomy
- Coverage Map
- Product Spotlight
- When a Finger Brace May Not Be Enough
- Common Mistakes
- Quick Tips
- FAQ
- Conclusion
Quick Answer: How Should a Finger Brace Fit?
A finger brace should fit securely enough to stay in its intended position without creating excessive pressure or unnecessarily restricting movement. Adjustability can help fine-tune positioning and coverage within the product’s design range, while correct sizing remains important. Check the brace for secure placement, comfortable contact, appropriate coverage, and normal movement allowed by the design.
If you are still at the stage of understanding the basic product, the foundational reference Adjustable Finger Support Sleeve: What Is It and How Does It Work? explains the product category and mechanism in detail. This guide assumes you already understand the basics and now want to know how to evaluate fit, adjustability, and coverage correctly.
Getting the fit right is the most practical thing you can do to make any finger brace work well. A brace with excellent design features can still fail if the fit is wrong. A brace with modest features can still work well if the fit is right. This guide focuses on the fit side of that equation.
What Does “Good Fit” Actually Mean?
Good fit is not a single property. It is the sum of several characteristics that work together. If any one of them is off, the brace may feel wrong — even if it looks correct. Understanding these characteristics makes it easier to diagnose fit problems and correct them.
1. Secure Positioning
The brace should not constantly shift during normal use. If it slides, rolls, or requires frequent readjustment, positioning is not secure.
2. Appropriate Coverage
The intended finger area should remain covered during the activity. Coverage that shifts away from the target area is a fit problem.
3. Comfortable Contact
The material should not create obvious pressure points. Edges, seams, and fasteners should sit smoothly against the skin.
4. Appropriate Movement
The brace should not restrict movement beyond what its design intends. Movement restrictions should be consistent with the product’s purpose.
5. Stable Placement
It should remain reasonably positioned during the intended activity, without requiring constant attention or readjustment.
6. Practical Usability
The brace should be easy to put on, adjust, and remove for your routine. Practicality matters for daily wear.
Each of these characteristics interacts with the others. A brace that is too tight may seem secure but creates discomfort. A brace that is too loose may feel comfortable but shifts during use. A brace with the right tension but wrong positioning may cover the wrong area. The target is the combination that works — not any single characteristic in isolation.
Practical implication: When a brace feels wrong, do not assume the size is incorrect. The problem may be positioning, adjustment, or coverage. Check each factor before concluding that the product itself is wrong for you.
Finger Brace Fit vs Finger Brace Size
The distinction between fit and size is one of the most useful concepts in this guide. They are related but different, and confusing them leads to unnecessary frustration.
Size
Whether the product’s dimensions are appropriate for your finger. Size is determined by comparison: your finger’s measurements against the product’s measurements and sizing chart. It is a matching problem solved before the product is on your finger.
Fit
How the product actually sits on the finger during use. Fit is determined by positioning, adjustment, coverage alignment, and how the product behaves during movement. It is a practical outcome that can change even when the size is correct.
You can select the correct size and still experience poor fit. This happens when the product is positioned incorrectly, adjusted poorly, or doesn’t match the specific coverage you need. It also happens when finger shape differs from what the product was designed for, or when activity-related movement shifts the brace.
Incorrect positioning
Wrong coverage area
Incorrect adjustment
Finger shape variations
Product design limitations
Activity-related movement
This distinction prevents a common mistake: assuming that selecting S/M/L automatically solves every fit problem. Size is the starting point. Fit is the goal — and it takes positioning and adjustment to get there.
Understanding Adjustability
Adjustability is the feature that allows the wearer to modify fit after the product is on the finger. It is what separates an adjustable brace from a fixed design. Understanding what adjustability can and cannot do makes it much easier to evaluate a specific product.
Circumference and fit
Position along the finger
Stability during movement
Coverage alignment
Contact against the skin
Ease of repositioning
Important limits: Adjustability has limits determined by the product’s construction and adjustment range. Adjustability is not unlimited fit. It is not universal sizing. And it does not create stronger support simply by being tighter.
The distinction between adjustment and stretch is worth reinforcing here. A material can stretch to conform to the finger without giving the wearer any control over the fit. Adjustment requires a mechanism the wearer can deliberately change. The guide How Adjustable Finger Sleeves Create a More Flexible Fit explains the difference in more depth.
When evaluating an adjustable brace, check whether the adjustment range is stated, how the adjustment mechanism works, and whether the adjustment stays secure during movement. A product that adjusts but slips is not really helping. A product that adjusts within a narrow range may offer less fit flexibility than its marketing suggests.
Coverage: What Does It Actually Mean?
Coverage refers to which part of the finger the brace protects, supports, or contacts. It is a physical property of the product — set by its design and dimensions — not something that adjustment can extend. Understanding coverage types helps you match a product to your specific needs.
Partial Coverage
Covers a specific portion of the finger, such as the fingertip or the middle section. Suited to activities where only one area needs attention.
Joint-Area Coverage
Designed around a particular finger area or joint. Suited to situations where a specific joint area is the focus of the product’s coverage.
Extended Coverage
Covers a larger section of the finger. Suited to situations where broader coverage is useful. May add bulk or limit movement depending on design.
Important: More coverage is not automatically better. The appropriate amount of coverage depends on the product’s intended design and your specific purpose. A brace designed for fingertip coverage does not become a full-finger support just because it covers more of the finger.
Coverage also interacts with fit in a practical way. If the brace covers an area larger than you need, the extra material may affect movement or comfort. If it covers less than you need, it may not provide the coverage you were looking for. Matching coverage to purpose is more useful than maximizing it.
Coverage vs Movement
Coverage and movement are in tension. More coverage often means more material, which can affect flexibility and how the finger moves. Less coverage often means more freedom, but potentially less protection in the covered area. Neither is universally better — the right balance depends on what you need.
More Coverage Can Affect
- Flexibility of the finger
- Finger movement range
- Grip and handling
- Dexterity during fine tasks
- Overall product profile
Less Coverage Can Offer
- Greater freedom of movement
- Lower profile during tasks
- Easier interaction with objects
- Less interference with grip
- More natural finger feel
Actual performance depends heavily on the specific brace design. A brace with a thin, flexible material may cover more of the finger without restricting movement much. A brace with a thicker, more structured material may restrict movement noticeably even with modest coverage. The design matters as much as the amount of coverage.
For everyday activities, the balance usually leans toward less coverage with more movement. The activity-specific reference Finger Protector Sleeves for Everyday Activities: What to Know covers this trade-off in the context of daily use.
The 5-Step Finger Brace Fit Process
This is the practical framework the rest of the guide builds toward. It is the sequence to follow every time you fit a finger brace, whether it is new or already familiar.
Step 1 — Identify the Intended Area
Before putting on the brace, understand which finger it is designed for, what area it covers, and how the product should be positioned. Read the manufacturer’s instructions if available. Knowing the intended coverage area in advance makes it much easier to check whether the brace is placed correctly.
Step 2 — Check the Size
Follow the manufacturer’s sizing information. If measurements are provided, use those rather than guessing based only on appearance. If the sizing chart is unclear or missing, that is a limitation of the listing. Do not assume that adjustment will fix a size that is fundamentally wrong.
Step 3 — Position the Brace
Place it according to the product instructions. Check whether the intended coverage area is actually covered. Look at the edges of the brace and confirm they sit where expected. If the positioning is off, adjust before tightening.
Step 4 — Adjust Gradually
If the brace is adjustable, start from a loose position and adjust gradually. Do not immediately tighten it as much as possible. Small adjustments are easier to fine-tune than large ones. After each adjustment, check that the brace still sits in the intended position.
Step 5 — Test Comfort and Movement
Check whether the brace is slipping, bunching, or shifting. Confirm coverage is still correct. Check whether it feels excessively tight. Test the movement you would normally do during your activity and confirm the brace allows it. If anything feels off, return to Step 3 or Step 4 and correct it.
Practical note: If you are fitting a brace for the first time, take your time on Steps 3 and 4. Most fit problems can be prevented by careful positioning and gradual adjustment. Rushing these steps is the most common cause of poor fit.
The Three Fit Zones
Every finger brace fit falls into one of three zones. Understanding what each looks and feels like makes it easier to recognize when the fit is right and when it needs attention.
Interactive: The Three Fit Zones
Tap each zone to see what to watch for
TOO LOOSE
Sliding and shifting
APPROPRIATE
Secure and comfortable
TOO TIGHT
Excessive pressure
Appropriate Fit
Secure positioning during movement. Intended coverage maintained. Comfortable contact with the skin. Movement consistent with the product’s design. This is the target — not the tightest fit, but the fit that works.
Too Loose — Signs
- Sliding during use
- Frequent repositioning
- Bunching material
- Inconsistent coverage
Appropriate — Signs
- Secure positioning
- Intended coverage maintained
- Comfortable contact
- Movement consistent with design
Too Tight — Warning Signs
- Excessive pressure
- Increasing discomfort
- Numbness or tingling
- Significant discoloration
Important: If any of the “too tight” warning signs occur, do not simply tighten the brace further. Loosen or remove it and reassess. Persistent numbness, tingling, or significant discoloration should be assessed by a qualified professional if symptoms do not resolve.
How to Check Finger Brace Coverage
Coverage checking is a practical routine that can be done before, during, and after activity. Each stage catches different problems.
Before Use
- Is the intended area covered?
- Is the brace positioned correctly?
- Are the edges sitting where expected?
- Is any part folding or bunching?
During Movement
- Does it shift during activity?
- Does coverage change significantly?
- Does it interfere with the activity?
- Does it catch on objects or surfaces?
After Activity
- Has it moved from its original position?
- Has discomfort developed?
- Does the fit still feel appropriate?
- Are there marks that suggest too much pressure?
This routine takes less than a minute each time and prevents most fit problems from affecting the activity. It is especially useful when trying a new brace or using a brace for a new activity for the first time.
Finger Shape and Individual Fit
Two people can use the same product and experience different fits. This is not a product defect — it is a consequence of natural variation in finger anatomy and movement patterns. Understanding the factors that affect fit helps explain why the same brace can work well for one person and less well for another.
Finger circumference
Finger length
Finger shape and taper
Joint location and size
Skin and material interaction
Movement patterns and activity
This is why product dimensions and the manufacturer’s sizing information should take priority over generic size assumptions. A “medium” from one manufacturer may not correspond to a “medium” from another. Your finger’s specific measurements matter more than size labels.
Adjustability and Coverage: How They Work Together
Adjustability and coverage interact in a chain that determines how the brace behaves in practice. Adjusting the brace changes its position, which changes how it contacts the finger, which can change the effective coverage and how the brace behaves during movement.
This chain explains why adjusting a brace sometimes changes more than expected. Tightening the brace may shift it slightly, which changes where the edges sit, which changes what the brace covers, which changes how it feels during movement. Understanding this chain makes it easier to diagnose fit problems: when something feels wrong, trace back through the chain to find where the problem started.
Practical application: If the brace feels wrong after adjusting, do not just adjust again. Check whether the position has shifted, whether the coverage is still correct, and whether the contact against the skin has changed. Often the real issue is at the position or coverage stage, not the adjustment stage.
Fit During Everyday Activities
Different activities place different demands on a brace, and the fit can be evaluated against each one. This is a brief guide to what to check.
Typing
Check finger movement and whether the brace catches on keys. Verify that the fit allows low-profile finger action.
Writing
Check grip and finger positioning. The brace should not change how the pen is held or create pressure at the contact point.
Smartphone Use
Check tapping, swiping, and fingertip mobility. If the fingertip is covered, test touchscreen response.
Studying
Consider repeated desk movements. Check whether the brace stays comfortable over extended sessions.
Office Tasks
Check whether the brace remains stable during keyboard and mouse use. Verify that repetitive movement does not cause shifting.
Travel
Consider whether it remains comfortable during extended everyday activity. Check portability and ease of adjustment.
The key point is that fit is activity-dependent. A brace that fits well during typing may need adjustment for writing. A brace that works during desk work may need repositioning for household tasks. Fit is not a one-time achievement — it is an ongoing check.
Common Finger Brace Fit Problems
These are the most common fit-related problems and their likely causes. These are possible fit-related explanations, not diagnoses.
Possible fit issue: too loose or incorrect positioning.
Check: size and adjustment level.
Possible fit issue: material or positioning problem.
Check: placement and coverage alignment.
Possible fit issue: pressure or incorrect position.
Check: reposition and reassess the fit.
Possible fit issue: design, coverage, or fit mismatch.
Check: whether the restriction matches the intended movement.
Possible fit issue: poor positioning or adjustment.
Check: recheck placement and adjustment stability.
Possible fit issue: excessive pressure.
Stop and reassess immediately. Seek advice if symptoms persist.
Possible fit issue: fit or design mismatch.
Check: sizing and follow the manufacturer’s instructions.
Possible fit issue: pressure points or material contact.
Check: fit, edges, and moisture behavior after extended wear.
Adjustability vs Fixed Fit
This is a brief comparison. The detailed comparison has its own dedicated article.
| Factor | Adjustable | Fixed |
|---|---|---|
| Fit customization | More adjustable within its range | More predetermined |
| Positioning | Can often be fine-tuned | Usually less adjustable |
| Coverage | Can sometimes be repositioned | Generally determined by design |
| Sizing | Still important | Still important |
| Comfort | Depends on correct adjustment | Depends on correct sizing |
| Movement | Depends on construction | Depends on construction |
Important conclusion: Adjustable does not automatically mean better. It simply provides a different way of managing fit. For the detailed comparison, see Adjustable Finger Brace vs Fixed Support: What’s the Difference?
How to Measure Before Buying
Measuring before buying prevents most fit problems. The specific measurements required depend on the manufacturer’s sizing system — so always use the specific manufacturer’s measurement diagram when available. Different products can use different sizing systems.
Common Measurements
- Finger circumference at the target area
- Finger length where relevant
- Relevant joint location
- Intended finger (index, middle, ring, pinky)
- Desired coverage area
Important Notes
- Use the manufacturer’s diagram — not generic assumptions
- Measure at a normal temperature, not after activity
- Measure the specific finger you will use
- Do not stretch the measuring tape tightly
- If borderline between sizes, check the adjustment range
If the manufacturer provides a sizing chart, use it. If the chart is unclear, contact the seller before purchase. The broader buying guide Finger Support Sleeve Buying Guide: Fit, Design, and Comfort covers selection considerations in more detail.
Does My Brace Fit Correctly? Interactive Check
Run this check to see whether your current brace fit matches the basic characteristics of a correctly positioned support. This is a practical fit check, not a medical assessment.
Finger Brace Fit Checklist
Tap each item that applies to your current fit.
Check the items above to see your fit summary.
Correct Fit Anatomy: 3D Interactive
This interactive shows the five anatomical zones of a properly fitted finger brace. Tap each zone to see what to evaluate.
Interactive 3D: Finger Brace Fit Anatomy
Tap each zone to see what it contributes to fit
Adjustment Area
Where the fit can be modified. This is the mechanism the wearer uses to change tightness, positioning, or coverage. Check that the adjustment works smoothly and stays secure during movement.
All zones work together. A good fit comes from the interaction between them, not from any single zone.
Coverage Map: Where Does Your Brace Sit?
Coverage is easier to think about as a map of the finger rather than as a single dimension. Different products cover different sections. Tap each section to see what it means for fit.
Interactive: Finger Coverage Map
Tap each section to see what to check
Joint Area Coverage
Check whether the brace covers the joint area specifically. Joint coverage typically requires a design that follows finger curvature. Confirm whether the product allows the movement you need or is intended to limit movement at the joint.
Product Spotlight: A Product to Consider When Fit Adjustability Is a Priority
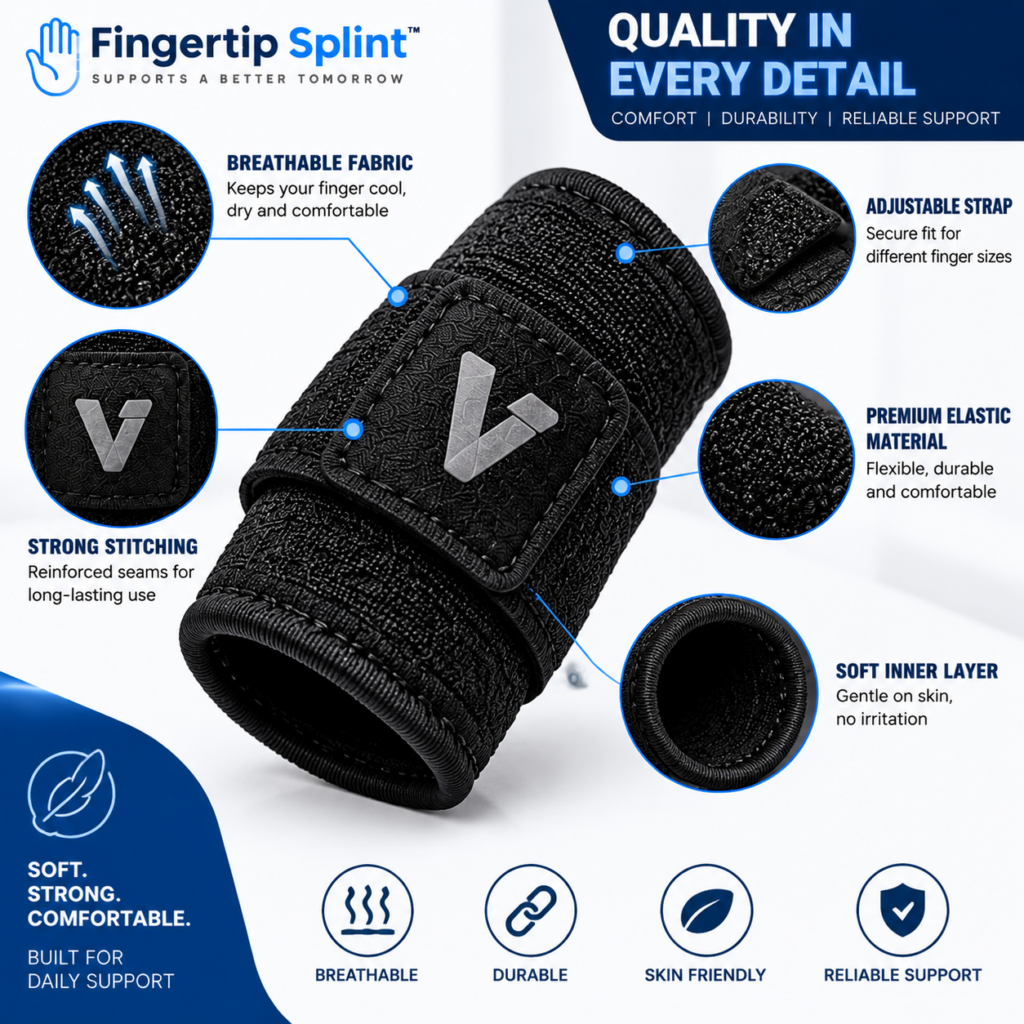
For readers who have decided that fit adjustability matters for their situation, here is a specific product to examine. The Adjustable Finger Support Sleeve is one option to consider if customizable fit and positioning are among your priorities.
Adjustable Finger Support Sleeve
- Adjustable design for customizable fit
- Flexible sleeve-style construction
- Designed for finger coverage and positioning
- Full product specifications available on the product page
What to Examine on the Product Page
Adjustable Design
Check how the adjustment works, what changes when it is adjusted, and whether the adjustment stays secure during movement.
Coverage
Review the coverage area. Confirm the product covers the specific finger area you need, and compare its dimensions against your requirements.
Material and Construction
Review the listed materials, thickness, and inner surface description. Confirm the construction suits your comfort and activity needs.
Intended Fit and Positioning
Review the sizing information. Compare your measured finger circumference against the stated range before relying on adjustment.
Everyday Usability
Consider how the sleeve’s characteristics match the activities you do most. Review the care instructions and confirm the intended use aligns with your situation.
When a Finger Brace May Not Be Enough
A finger brace is a consumer product designed for fit, positioning, and everyday use. It is not a substitute for professional assessment or for a prescribed medical support.
Seek professional assessment rather than relying on a finger brace if you have: significant or worsening pain, visible deformity, major swelling, substantial loss of movement, persistent numbness or tingling, significant discoloration, or symptoms that are not improving.
If a healthcare professional has prescribed a particular splint, brace, or immobilization method, follow that guidance. A consumer finger brace is not a substitute for a prescribed support. The point of this section is not to diagnose — it is to explain the limits of general product-fit guidance.
For general information about hand and finger conditions, the following authoritative resources are useful:
- Mayo Clinic for condition overviews and patient education.
- AAOS OrthoInfo for musculoskeletal guidance from orthopedic specialists.
- MedlinePlus hand injuries and disorders for a broad reference library.
- NHS guide on hand pain for UK-based clinical guidance.
- Cleveland Clinic for clear patient-oriented explanations.
- Johns Hopkins Medicine for clinical and research-based perspectives.
- FDA for regulatory context on medical devices.
- NIH for research-based health information.
- WebMD for general overviews.
- Healthline for practical wellness information.
These resources provide general information and do not replace individualized advice from a qualified healthcare professional.
Common Mistakes to Avoid
These mistakes come up repeatedly when people fit and use finger braces. Avoiding them makes the fit better and the experience more comfortable.
Guessing based on appearance or past sizes often leads to incorrect fit.
Check: measure your finger and compare to the sizing chart.
Sizing systems vary between manufacturers.
Check: use the specific manufacturer’s chart, not generic assumptions.
Adjustment works within a range and does not replace correct sizing.
Check: the adjustment range and base size before relying on adjustment.
Tightness is not a measure of support and can cause discomfort or concerning symptoms.
Check: adjust for comfort and secure positioning, not maximum pressure.
Slipping means the fit is not secure and the brace is not doing its job.
Check: size, positioning, and adjustment level.
Bunching creates uneven contact and may indicate a positioning or coverage issue.
Check: placement and coverage alignment.
Coverage that restricts movement unnecessarily may not be the right fit for your activity.
Check: whether the movement allowed matches what you need.
More coverage may add bulk and restrict movement.
Check: whether the coverage matches your specific purpose.
Numbness, tingling, or significant discoloration should not be ignored.
Check: remove the brace and seek appropriate advice if symptoms persist.
A general finger brace is not protective equipment against sharp objects, heat, or chemicals.
Check: the manufacturer’s stated intended use for the product.
Quick Tips for a Better Finger Brace Fit
Frequently Asked Questions
A finger brace should fit securely enough to stay in its intended position without creating excessive pressure or unnecessarily restricting movement. The fit should provide secure positioning, appropriate coverage, comfortable contact, and movement consistent with the product’s design. It should not slide, bunch, or create numbness, tingling, or significant discoloration. The goal is an appropriate fit, not the tightest possible fit.
It should feel snug and secure but not tight. The brace should stay positioned during intended movement, allow the intended movement, and remain comfortable through wear. It should not create unnecessary pressure, numbness, tingling, or concerning discoloration. Tightness is not a measure of support. If you notice concerning symptoms, loosen or remove the brace and seek appropriate advice if symptoms persist.
Coverage refers to which part of the finger the brace protects, supports, or contacts. Coverage types include partial coverage (a specific portion of the finger), joint-area coverage (designed around a particular area or joint), and extended coverage (a larger section of the finger). The appropriate amount of coverage depends on the product’s intended design and your specific purpose. More coverage is not automatically better — it may add bulk or restrict movement.
No. More coverage means more of the finger is covered by the product, but it does not automatically mean better support. More coverage can affect flexibility, finger movement, grip, dexterity, and product profile. Less coverage can offer greater freedom of movement, lower profile, and easier interaction with objects. The right balance depends on what you need the brace to do.
Yes, when used within the product’s intended range. Adjustment can help fine-tune positioning and coverage, which can improve fit for users whose finger dimensions fall between standard sizes or whose needs change across activities. However, adjustability has limits. It does not replace correct sizing, and it cannot compensate for a fundamentally wrong size or an unsuitable coverage design.
Slipping and bunching can have several causes: incorrect size, incorrect positioning, insufficient adjustment for the movement level, finger shape that differs from the product’s design assumptions, or material that does not grip well for your activity. Before assuming the size is wrong, check the adjustment level, verify the position, and consider whether the product’s design matches your activity. Do not simply tighten as a default — that may create pressure problems.
Stop using the brace and seek professional advice if you experience significant or worsening pain, visible deformity, major swelling, substantial loss of movement, persistent numbness or tingling, significant discoloration, or symptoms that are not improving. Also seek advice if a specific type of support has been recommended. A finger brace is a consumer product and cannot diagnose or treat a medical condition.
Fit Is Not Simply Tightness
Fit is a balance between secure positioning, intended coverage, comfortable contact, and appropriate movement. Understanding how adjustability affects positioning and coverage helps you evaluate any finger brace with confidence. Measure → Position → Adjust → Check Coverage → Test Movement → Reassess
The Bottom Line on Finger Brace Fit
A finger brace fit guide comes down to one practical framework: fit is a balance between position, coverage, comfort, and movement. Not tightness. Not appearance. Not any single characteristic on its own. The brace should stay in position, cover the intended area, feel comfortable against the skin, and allow the movement appropriate to its design.
Adjustability supports that balance by allowing the wearer to fine-tune positioning and coverage within the product’s intended range. But adjustability is not unlimited. It does not replace correct sizing, does not eliminate the need to check fit, and does not make a product universally suitable. What it does offer is more control over how the brace sits on the finger — and that control is useful when the fit needs fine-tuning.
If you want to continue exploring within this cluster, the comparison article Adjustable Finger Brace vs Fixed Support: What’s the Difference? covers the trade-offs in more depth, and the broader buying guide Adjustable Finger Support Sleeves: A Complete Guide for Buyers provides a wider reference. For a complete view of fit and selection, the framework in Choosing an Adjustable Finger Support: What Should You Consider? is a useful companion. Explore the full FingertipSplint blog library for more guides.
This article is for general information only and is not a substitute for professional medical advice. Always consult a qualified healthcare provider for diagnosis and treatment of any medical condition.