
Best Wrist Brace for Carpal Tunnel Support: What to Look For
You searched for the best wrist brace for carpal tunnel support, and now you’re facing dozens of products that all look similar: splints, braces, sleeves, compression wraps, adjustable straps, rigid inserts, open-finger designs. The confusion is real. The best wrist brace isn’t necessarily the most rigid, the most expensive, or the most heavily padded. The right choice depends on how well its design supports the wrist in an appropriate position, fits securely without excessive pressure, and matches when and how you plan to use it. This guide teaches you how to identify a suitable brace — not just which one to buy.
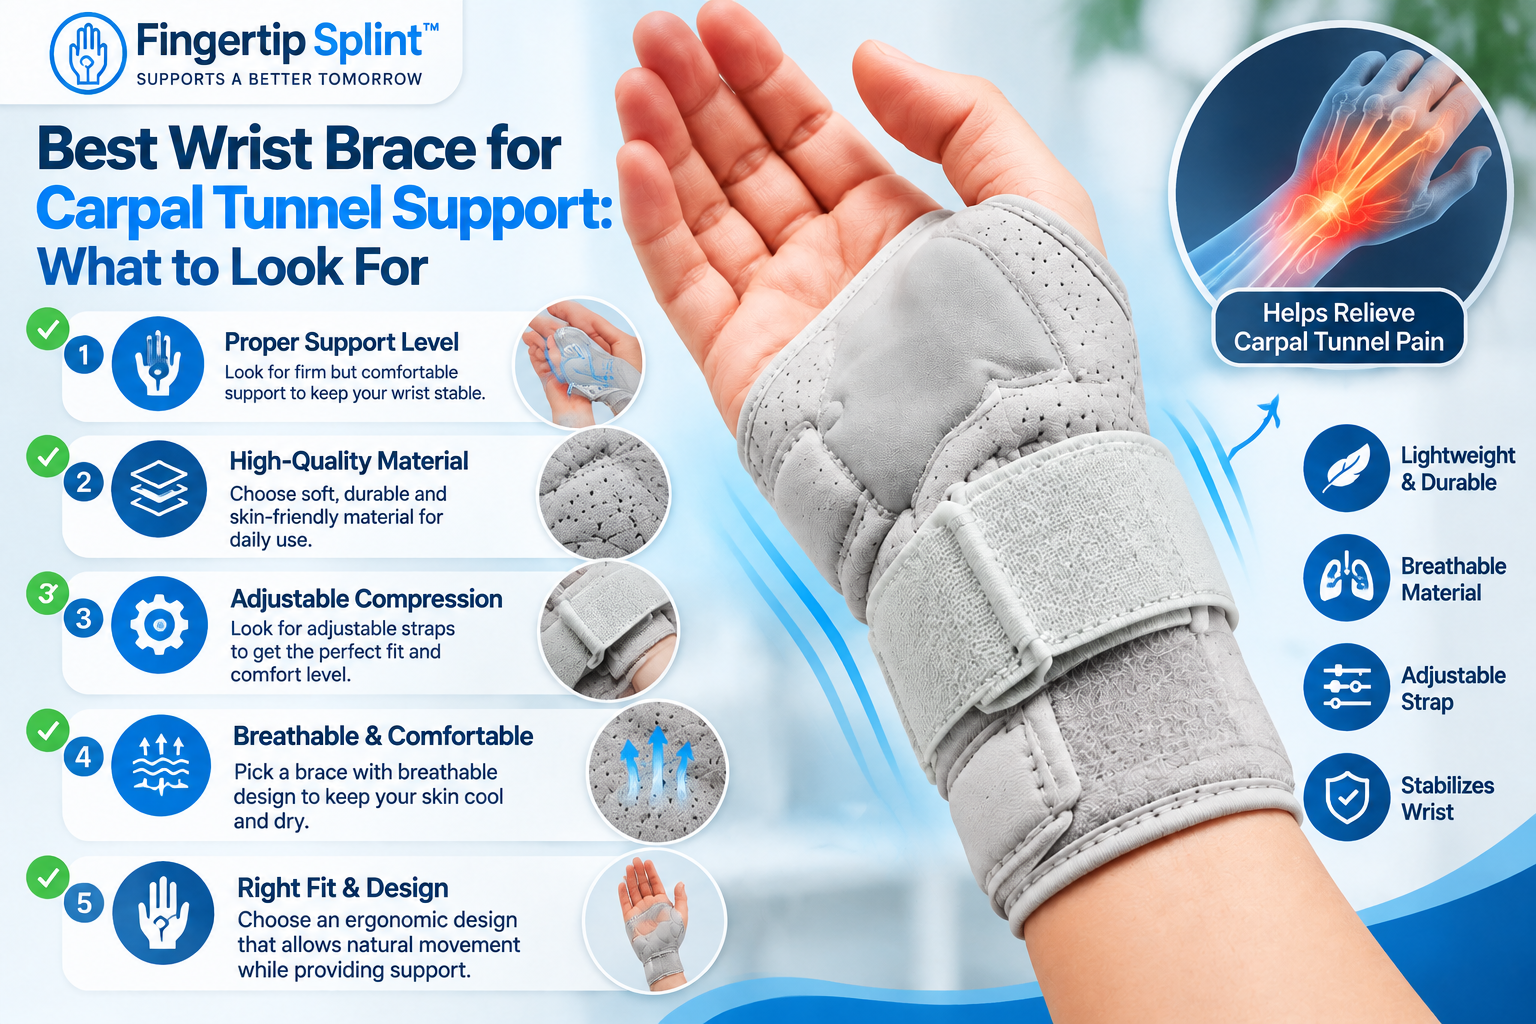
Carpal tunnel wrist brace designed to support the wrist during rest, work, and everyday activities
What This Buyer Guide Covers
- Quick Answer
- Why Choosing a Wrist Brace Can Be Surprisingly Difficult
- The 7 Features That Matter Most
- 3D Interactive: Anatomy of a Carpal Tunnel Wrist Brace
- Neutral Wrist Position: Why It Matters
- Rigid vs Flexible Wrist Brace
- Adjustable vs Fixed Wrist Brace
- Nighttime vs Daytime Use
- Fit and Sizing Guide
- Interactive: Is Your Brace Fit Correct?
- Material and Comfort
- Wrist Support vs Compression
- Interactive: Build Your Ideal Wrist Brace
- A Practical Example: Adjustable Wrist Brace for Carpal Tunnel Support
- Does This Wrist Brace Match Your Checklist?
- What to Expect After Starting a Wrist-Splint Trial
- 10 Wrist-Brace Buying Mistakes
- Who May Find Wrist Splinting Useful?
- Who Should Seek Professional Advice?
- What Would a Hand Specialist Want You to Check?
- Interactive: Buyer Decision Tree
- Build a Practical Wrist-Support Setup
- 7 Fast Buying Tips
- FAQ
- Conclusion
Quick Answer: What Should You Look For in the Best Wrist Brace for Carpal Tunnel Support?
Look for neutral wrist positioning, appropriate support, adjustable fit, comfortable materials, correct sizing, intended wearing time, and easy adjustment. The best brace is one that keeps your wrist in an appropriate position, fits snugly without being tight, and matches when and how you plan to use it.
If you want a more detailed breakdown of fit, features, and support, the reference carpal tunnel wrist brace buying guide covers the topic in more depth. This article focuses specifically on what to look for before you buy.
Why Choosing a Wrist Brace Can Be Surprisingly Difficult
Buying a wrist brace for carpal tunnel support should be simple. But it rarely is. Three problems create confusion for buyers, and understanding them helps you make a better decision.
Problem 1 — Too Many Designs
A buyer sees splint, brace, sleeve, support, and wrap — and assumes they are interchangeable. They are not. These terms can describe products with very different physical structures. A splint may have a rigid insert designed to limit wrist movement. A sleeve may be a flexible compression garment. A brace may be something in between. A wrap may be a simple strap system without structural support. The name alone does not tell you what the product actually does.
Problem 2 — “More Support” Sounds Better
More support sounds like more protection. But more support is not always appropriate. A highly rigid device may be uncomfortable for someone looking for nighttime support. A very flexible sleeve may not provide enough positional control for another use. The goal is appropriate support, not maximum support. The right level depends on your symptoms, your activities, and when you plan to wear the brace.
Problem 3 — Compression vs Positioning
This is a major distinction that many buyers miss. A compression sleeve may provide pressure, warmth, and a close fit. But a carpal-tunnel-oriented wrist splint may have a different primary design goal: controlling wrist position. The AAOS specifically discusses nighttime bracing that keeps the wrist in a neutral position, and Mayo Clinic notes that a wrist splint can help ease nighttime symptoms. The distinction matters because a compression product may not provide the positional control that a carpal-tunnel brace is designed for.
Important: The word “brace” can refer to different physical constructions. Before you buy, check what the product actually does — not just what it is called. For a closer look at how brace designs differ, the reference what to look for in a carpal tunnel wrist brace covers selection criteria in more detail.
The 7 Features That Matter Most
This is the core of the article. Understanding these seven features helps you evaluate any wrist brace before purchasing.
Feature 1 — Neutral-Position Support
Wrist positioning is central to how a carpal-tunnel brace is designed to function. Look for a design intended to prevent excessive wrist flexion or extension rather than simply wrapping the wrist tightly. Do not assume that every brace must hold the wrist at one exact angle unless the product specification says so. The key is that the brace is designed around wrist position, not just compression.
Feature 2 — Adjustability
Adjustability allows the fit to be customized. Look for hook-and-loop straps, adjustable circumference, multiple fastening points, and customizable tightness. Different wrists have different dimensions, and adjustment can help achieve a secure but comfortable fit. Mayo Clinic recommends a splint that is snug, not tight — adjustment is how you achieve this.
Feature 3 — Correct Size
Small isn’t automatically better support. Tight isn’t automatically better support. A poorly sized brace can lead to pressure points, slipping, discomfort, skin irritation, and poor positioning. Follow the manufacturer’s sizing instructions carefully. Measure your wrist before ordering.
Feature 4 — Support Structure
Check whether the product contains a rigid insert, semi-rigid support, flexible reinforcement, or compression-only structure. Each design serves a different purpose. A rigid insert provides more positional control. A flexible design allows more movement. The right structure depends on what you need the brace to do.
Feature 5 — Comfort
Comfort matters especially for a nighttime brace because you may wear it for several hours. Consider padding, breathability, seams, edge construction, material, heat retention, and skin contact. A brace that creates pressure points or traps heat may be difficult to tolerate overnight.
Feature 6 — Finger Freedom
An open-finger design can be useful for some buyers. Potential benefits include easier hand movement, easier gripping, and easier device use. However, an open-finger design isn’t always superior — the right choice depends on what you need the brace to do during wear.
Feature 7 — Ease of Use
A buyer shouldn’t need a complicated setup. Evaluate whether the brace can be adjusted one-handed, whether the straps are accessible, whether it’s easy to put on at night, whether it can be removed quickly, and whether it’s easy to wash and care for.
Anatomy of a Carpal Tunnel Wrist Brace: 3D Interactive
This interactive shows the key components of a carpal tunnel wrist brace. Tap each component to see what it contributes.
Interactive 3D: Anatomy of a Carpal Tunnel Wrist Brace
Tap each component to explore its role
1. Wristband
The main wearable structure. The wristband wraps around the wrist and provides the foundation for the other components. Its material, width, and construction affect comfort, breathability, and durability.
What to check before buying: position control, size, adjustability, comfort, material, intended use.
Neutral Wrist Position: Why It Matters
The concept of neutral wrist position is central to how a carpal-tunnel brace is designed. Neutral position generally means the wrist is not bent significantly forward or backward — it sits in a relaxed middle position. AAOS discusses nighttime bracing that keeps the wrist in a neutral position as a common nonsurgical approach.
A brace designed to support neutral position limits the extremes rather than holding a rigid angle. This is different from a brace designed purely for compression or immobilization. Understanding this distinction helps you evaluate whether a specific brace is designed around position control or whether it is primarily a compression product.
Important: Neutral position does not mean every brace holds the wrist at one exact angle. It means the brace is designed to limit excessive movement in either direction. Check the product’s specific construction and intended use.
Rigid vs Flexible Wrist Brace
This is one of the most important buyer decisions. Rigid and flexible braces serve different purposes, and neither is universally better.
| Feature | Rigid / Semi-Rigid Brace | Flexible Wrist Support |
|---|---|---|
| Position control | Higher potential | Lower potential |
| Flexibility | Lower | Higher |
| Comfort | Depends on design | Often easier to tolerate |
| Mobility | More restricted | Greater |
| Night use | Can be suitable | Depends on design |
| Everyday tasks | May interfere | Often easier |
| Support structure | More pronounced | Limited |
| Best question to ask | “Do I need more positional control?” | “Do I mainly need lightweight support?” |
A rigid or semi-rigid brace is designed to limit movement more substantially. It may be appropriate when positional control is the priority — for example, during nighttime wear when the goal is to prevent the wrist from bending. A flexible brace is designed to provide lighter support with more freedom of movement. It may be appropriate when you need to use your hand during the day and don’t want a rigid device interfering with activity.
The right choice depends on your symptoms, your activities, and when you plan to wear the brace. Neither is universally better. Mayo Clinic notes that a wrist splint worn at night can help ease symptoms — this is often a rigid or semi-rigid design — while daytime use may call for something more flexible. The appropriate design depends on the specific situation.
Adjustable vs Fixed Wrist Brace
This comparison focuses on how the brace is fitted. Both approaches have advantages depending on the situation.
Adjustable
Potential advantages:
- Personalized fit
- Easier tightening or loosening
- Accommodates different wrist sizes
Fixed
Potential advantages:
- Simple
- Fewer adjustment steps
- Consistent construction
Buyer takeaway: Adjustability is valuable when fit is difficult to predict, but more adjustment points don’t automatically mean better support. If adjustability is your main concern, the reference choosing an adjustable wrist brace for daily support covers straps, fit, and everyday use in detail.
Nighttime vs Daytime Use
This is a major section because the intended wearing schedule affects which features matter most.
Nighttime Use
Mayo Clinic recommends nighttime splinting as a nonsurgical option for carpal tunnel syndrome. The reasoning is that wrist position during sleep can aggravate symptoms, and a splint helps keep the wrist in a neutral position during the hours you are least aware of your posture.
Nighttime Checklist
- Comfort for extended wear
- Secure positioning
- Breathable material
- No excessive pressure
- Minimal bulk
Daytime Checklist
- Hand mobility
- Gripping ability
- Keyboard use
- Phone use
- Driving (follow manufacturer instructions)
- Work tasks
Important: Do not assume everyone should wear a brace continuously. Wearing schedules should depend on the intended use, your symptoms, and professional or manufacturer guidance. Follow the specific product’s instructions and professional advice where applicable.
Fit and Sizing Guide: How Tight Should a Wrist Brace Be?
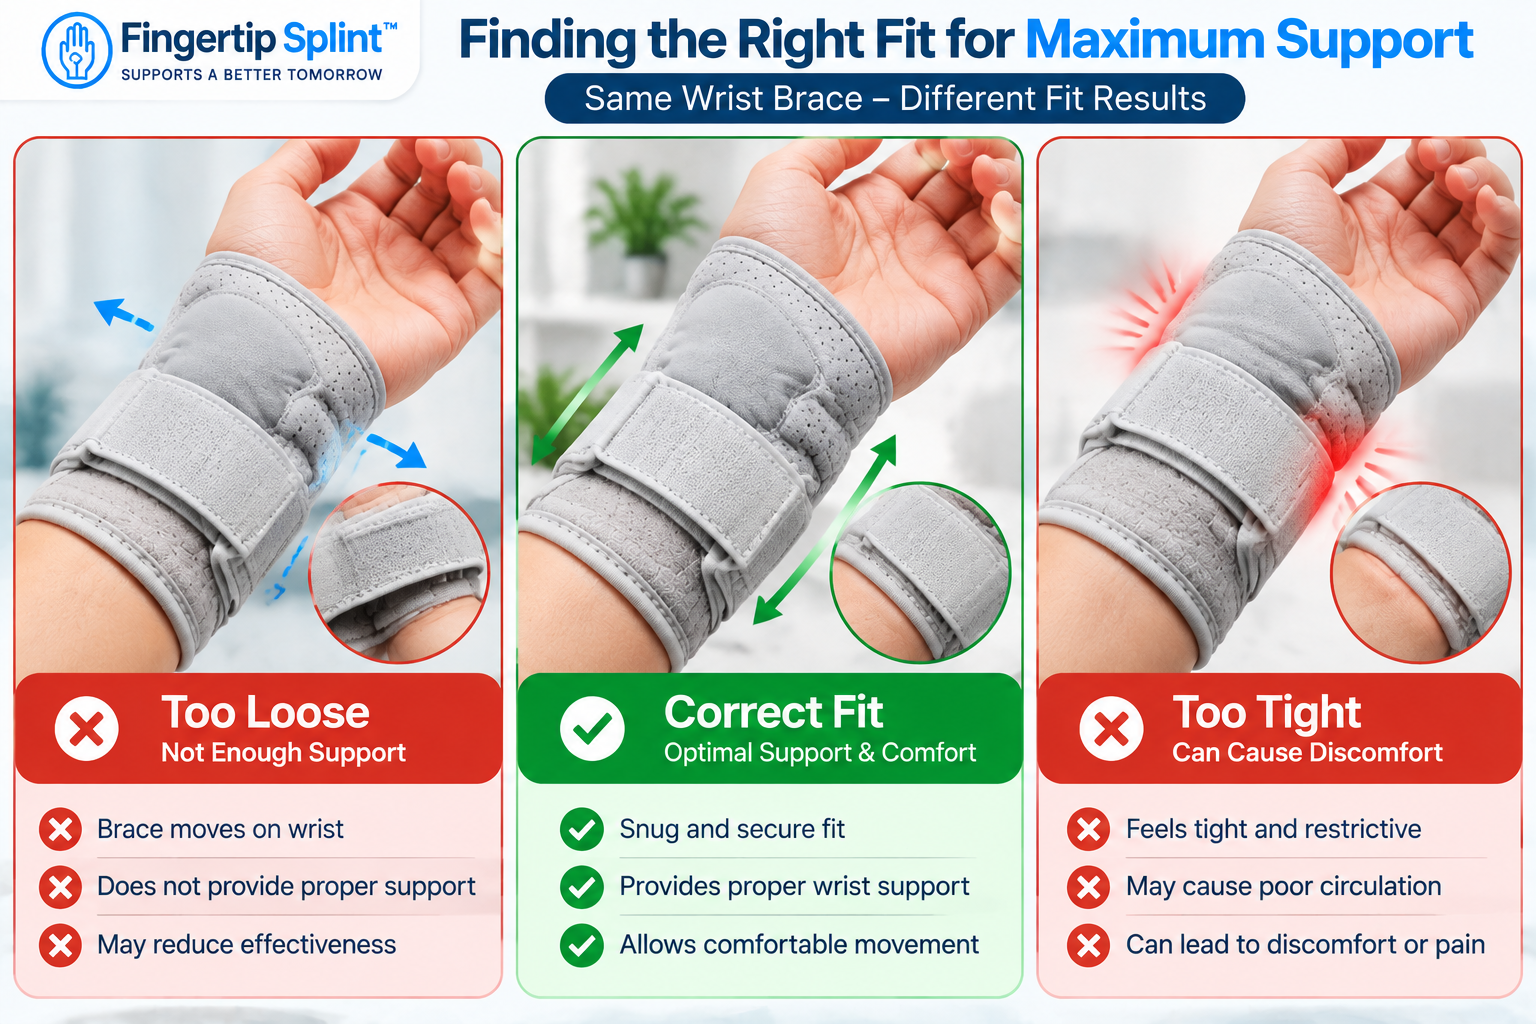
This is one of the most common buyer questions. The answer is simple: snug, not tight.
A Properly Fitted Brace Should
- Remain in position
- Not constantly slide
- Not create excessive pressure
- Not cause numbness or tingling
- Not cause concerning discoloration
- Not create persistent pain
Signs the Fit Needs Reassessment
- The brace slides repeatedly
- Fingers feel numb or tingle
- Skin changes color significantly
- Persistent pressure or pain
- The brace creates rubbing or irritation
Mayo Clinic specifically advises that a nighttime wrist splint should be snug but not tight. This is an important guideline. A brace that is too tight can cause its own problems, including numbness, tingling, and skin irritation. A brace that is too loose can slip, provide inconsistent support, and fail to maintain proper positioning.
Interactive: Is Your Brace Fit Correct?
Use this checklist to evaluate your brace fit. Click each item as you confirm it. This is an educational tool, not a medical assessment.
Is Your Brace Fit Correct?
Material and Comfort
Materials affect comfort, breathability, and skin contact. This section explains the practical differences between common material types.
Neoprene
Potentially flexible, supportive, and warm. Neoprene may be comfortable for some users but can trap heat and moisture during extended wear.
Breathable Fabric
Potentially lighter and more comfortable for extended wear. Breathable materials may help reduce heat buildup, especially during nighttime use.
Padded Construction
Potentially reduces pressure points. Padding can improve comfort where the brace contacts bony prominences or sensitive areas.
Rigid Insert
Potentially improves positional control. A rigid insert or splint provides more structure but may reduce flexibility and comfort.
Important: Actual product construction matters more than the material name alone. Two products both marketed as “neoprene” may have very different constructions. Look for specific information about the product’s materials and construction.
Wrist Support vs Compression
This is a distinction that many buyers miss, and it can prevent you from purchasing the wrong type of product.
Compression-Focused Product
Primary design: wrap, pressure, support.
A compression sleeve or wrap is designed to apply pressure and warmth to the wrist. It may improve comfort and provide a sense of support, but its primary function is not to control wrist position.
Positioning-Focused Splint
Primary design: limit unwanted wrist movement.
A wrist splint is designed to keep the wrist in a specific position — usually neutral — by limiting movement. Its primary function is positional control.
A compression product and a positioning splint are not necessarily designed for the same purpose. If your goal is to keep your wrist in a neutral position during sleep, a compression sleeve may not provide the positional control you need. If your goal is general support and warmth, a compression product may be appropriate. Understanding this distinction helps you choose the right type of product for your situation.
Interactive: Build Your Ideal Wrist Brace
Select your main priority to see what features to look for. This tool generates a buyer checklist — not a medical prescription.
Build Your Ideal Wrist Brace
What is your main priority? Select one to see what to look for.
- Look for comfortable material suitable for extended wear
- Check for secure fit without excessive pressure
- Look for neutral-position support
- Check for minimal pressure points
- Consider easy fastening for use when tired
- Check breathability to reduce heat buildup during sleep
A Practical Example: Adjustable Wrist Brace for Carpal Tunnel Support
After understanding the features, here is a specific product to evaluate. The adjustable wrist brace for carpal tunnel support is one example of a product designed with adjustable fit and wrist support. Evaluate it using the same criteria covered in this guide — not by the product name alone.
Adjustable carpal tunnel wrist brace featuring strap closure and targeted wrist support
1PCS Wrist Brace Carpal Tunnel Support
- Adjustable wrist brace design
- Carpal tunnel support positioning
- Strap closure system
- Wrist support for daily and nighttime use
- Full product specifications available on the product page
Evaluating the Product Using the Buyer Framework
Positioning
Review how the product is described in terms of wrist positioning. Check whether the design is oriented around neutral-position support.
Fit
Review the sizing information provided. Compare your wrist measurements against any stated range before relying on adjustment.
Adjustment
Review the strap system described. Consider whether the adjustment allows a snug but not tight fit.
Comfort
Review the materials described. Consider whether the construction seems appropriate for your intended wearing time.
Mobility
Review whether the design allows the hand movements you need. Consider whether finger and thumb access is appropriate.
Intended Use
Review what the manufacturer says about the product’s intended use. Consider whether it matches your needs.
Does This Wrist Brace Match Your Buying Checklist?
Instead of asking “is this the best wrist brace,” ask “does this wrist brace match my buying checklist?” Use this framework to evaluate any product.
| Buyer Requirement | What to Check |
|---|---|
| Positioning | Does it help limit unwanted movement? |
| Fit | Is your wrist within the sizing range? |
| Adjustment | Can you personalize the fit? |
| Comfort | Can you tolerate it for intended use? |
| Mobility | Can you perform necessary tasks? |
| Materials | Are they suitable for your skin and preferences? |
| Care | Can you maintain it properly? |
| Use | Does the intended use match your needs? |
Buyer takeaway: The right wrist brace is the one whose design matches your specific situation. Compare products against the requirements above rather than looking for a universal “best” product.
What to Expect After Starting a Wrist-Splint Trial
This is a tracking framework — not a guaranteed healing timeline. Individual experiences vary, and this article does not promise a specific recovery period.
First Few Nights
Focus on comfort, fit, whether the brace stays positioned, and whether it causes pressure or irritation. Some people notice improvement in nighttime symptoms within a few nights if nighttime splinting works for them, while others may need more time.
Weeks 1–2
Track nighttime symptoms, morning symptoms, numbness and tingling, sleep interruption, and overall tolerance. Note whether the brace feels more comfortable as you get used to it.
Weeks 3–6
Ask whether there is meaningful improvement, whether symptoms are becoming more frequent, whether daytime function is changing, and whether the brace is actually helping. Some people may notice improvement within a few nights; others may need several weeks.
Beyond the Trial
If symptoms persist, worsen, or include significant weakness or numbness, seek professional assessment rather than simply upgrading to a stronger brace.
Important: This is a tracking framework, not a guaranteed recovery timeline. Improvement timelines vary. Do not delay professional assessment if symptoms persist, worsen, or are concerning.
10 Wrist-Brace Buying Mistakes
These mistakes come up frequently when people choose wrist braces. Avoiding them improves your experience.
Rigidity is a design characteristic, not a quality ranking.
Check: whether the structure matches your intended use.
Sizing affects positioning and comfort.
Check: measure your wrist and compare against the manufacturer’s sizing chart.
More pressure isn’t automatically more support. Excessively tight braces can cause their own problems.
Check: aim for snug, not tight.
A brace you can’t tolerate overnight isn’t useful for nighttime wear.
Check: comfort, breathability, and minimal pressure points.
A compression sleeve and a positioning splint are not the same thing.
Check: whether the product’s primary design is compression or position control.
During the day, you may need finger and thumb mobility.
Check: whether the design allows the movements you need.
Materials affect comfort, breathability, and skin contact.
Check: whether the material is appropriate for your skin and wearing time.
A poorly fitting brace may create discomfort and fail to provide consistent support.
Check: correct sizing before purchasing.
A brace is a supportive tool, not a cure.
Check: whether professional assessment is appropriate.
If symptoms persist or worsen, don’t simply continue using the brace.
Check: whether reassessment or professional guidance is appropriate.
Who May Find Wrist Splinting Useful?
This section is informational. Different people come to wrist-splinting for different reasons, and similar symptoms can have different causes.
People With Symptoms Worse at Night
Some people experience nighttime tingling, numbness, or discomfort. Nighttime splinting may help ease symptoms by keeping the wrist in a neutral position during sleep.
People With Symptoms Related to Wrist Position
Some symptoms are aggravated by wrist position, such as during certain activities or positions. Positional support may help address these situations.
People With Mild-to-Moderate Symptoms
Current guidance commonly discusses wrist splinting as a nonsurgical option for mild-to-moderate carpal tunnel syndrome. Professional guidance may help determine whether splinting is appropriate.
People With Activity-Related Aggravation
Some people find that certain activities aggravate symptoms. A brace may help reduce aggravating movement during those activities.
Important: Similar symptoms can have other causes. A wrist brace is not a diagnostic tool. If you have persistent, worsening, or unusual symptoms, seek professional assessment rather than self-diagnosing.
Who Should Seek Professional Advice?
This is a prominent warning section. Certain symptoms warrant professional evaluation rather than self-selecting a brace.
Consider seeking professional evaluation if you experience:
- Persistent or worsening symptoms
- Significant weakness in the hand
- Persistent numbness that doesn’t resolve
- Difficulty gripping or holding objects
- Loss of hand function
- Muscle wasting (thinning of the muscles at the base of the thumb)
- Symptoms that don’t improve with conservative measures
- Severe or unusual symptoms
AAOS notes that persistent symptoms and signs such as weakness or muscle wasting warrant clinical attention. A brace may be a supportive tool, but it is not a substitute for diagnosis when symptoms are significant.
What Would a Hand Specialist Want You to Check?
This section is written with an EEAT (Experience, Expertise, Authoritativeness, Trustworthiness) perspective. It does not provide individualized medical advice, but it explains what a hand specialist might want you to consider before buying a wrist brace.
1. What Symptoms Are You Experiencing?
Understanding your symptoms helps clarify whether a brace is appropriate.
2. Are They Actually Consistent With Carpal Tunnel Syndrome?
Similar symptoms can have different causes. Professional assessment can help determine what is actually causing your symptoms.
3. Is the Brace Intended for Your Type of Use?
Different braces are designed for different purposes. Check whether the product’s intended use matches your situation.
4. Does It Maintain Appropriate Wrist Positioning?
Positional support is a key consideration. Consider whether the brace is designed around neutral-position support.
5. Is It Correctly Sized?
Fit affects positioning, comfort, and how the brace functions.
6. Can You Tolerate It?
If the brace is uncomfortable or causes skin irritation, it may not be usable as intended.
7. Are Symptoms Improving?
Reassessment is an important part of any self-care approach.
8. Is Further Evaluation Needed?
If symptoms persist or worsen, professional evaluation may be appropriate.
For general information about carpal tunnel syndrome, see the Mayo Clinic overview of carpal tunnel syndrome. For broader hand and wrist anatomy information, the Cleveland Clinic hand anatomy resource provides useful context. For an orthopedic perspective, the AAOS carpal tunnel syndrome library is a widely referenced resource. For general public health information, the NHS carpal tunnel syndrome guidance offers a practical overview. Additional medical reference information is available through MedlinePlus carpal tunnel syndrome information. For clinical and anatomy-focused context, Johns Hopkins Medicine carpal tunnel syndrome resource provides further reading. General educational context is also available through WebMD’s overview of carpal tunnel syndrome and Healthline’s general wrist and hand information. For peer-reviewed literature, NCBI PubMed Central hosts open-access research where appropriate.
Important: This article does not provide individualized medical advice. Always consult an appropriate healthcare professional regarding your specific situation.
Interactive: Buyer Decision Tree
Answer the questions below to see what to prioritize. This is a buyer education tool, not a medical recommendation.
Buyer Decision Tree
Select the question that best matches your situation.
Build a Practical Wrist-Support Setup
Support isn’t just about the brace itself. A practical setup combines the brace with other supportive habits. This isn’t about buying multiple medical products — it’s about combining the right brace with small adjustments that may help.
Wrist Brace
For positional and support needs according to the intended use. Choose a brace that matches your symptoms, activities, and wearing schedule.
Ergonomic Changes
Keyboard and mouse positioning, chair height, and desk setup can affect wrist position during work. Regular breaks can also help reduce strain.
Activity Modification
Reducing repetitive or aggravating wrist positions may help reduce symptom flares. Mayo Clinic recommends activity modification and frequent breaks alongside other nonsurgical measures.
Education
Understanding how to use and select a brace helps you get more from the product. Exploring the FingerTipSplint wrist and finger support articles provides additional context on brace selection and daily use.
Important: This bundle is about support plus habits plus education — not about implying multiple products are medically necessary. Follow professional guidance where applicable.
7 Fast Buying Tips
Frequently Asked Questions
Look for neutral-position support, adjustability, correct sizing, appropriate support structure, comfort, finger freedom if you need it, and ease of use. The best brace is one that keeps your wrist in an appropriate position, fits snugly without being tight, and matches when and how you plan to use it. Compare products against these features rather than relying on the product name alone.
No — a carpal tunnel wrist brace should be snug, not tight. Mayo Clinic specifically advises that a nighttime wrist splint should be snug but not tight. A brace that is too tight can cause numbness, tingling, skin irritation, and discomfort. Signs that the fit needs reassessment include the brace sliding repeatedly, fingers feeling numb or tingling, significant skin discoloration, or persistent pressure or pain. Follow the manufacturer’s sizing and adjustment instructions.
There is no universal winner. A rigid or semi-rigid brace provides more positional control, which may be useful for nighttime wear when the goal is to prevent the wrist from bending. A flexible brace provides lighter support with more freedom of movement, which may be useful during the day. The right choice depends on your symptoms, activities, and wearing schedule. Neither is universally better — the appropriate design depends on the specific situation.
Nighttime wrist splinting is commonly discussed as a nonsurgical option for carpal tunnel syndrome. Mayo Clinic recommends nighttime splinting to help ease nighttime tingling and numbness. Wearing schedules vary depending on the individual and their symptoms. Follow the manufacturer’s instructions and professional guidance where applicable. Do not assume that continuous wear is appropriate — the right schedule depends on your specific situation.
Daytime use depends on your activities and the specific brace. A brace that restricts finger movement may interfere with tasks that require fine motor control, such as typing or writing. A more flexible design may be easier to wear during the day. Consider what movements you need during your daily activities and whether the brace allows them. Follow the manufacturer’s intended-use guidance and professional advice where applicable.
There is no guaranteed timeline. Some people notice improvement within a few nights if nighttime splinting works for them. Others may need several weeks of consistent use before noticing meaningful change. Individual experiences vary depending on the underlying issue, severity, and how consistently the brace is worn. This article does not promise a fixed recovery period. If symptoms persist or worsen, seek professional assessment rather than continuing to rely on the brace alone.
Consider seeking professional assessment if you have persistent or worsening symptoms, significant weakness, persistent numbness, difficulty gripping, loss of hand function, muscle wasting, symptoms that don’t improve with conservative measures, or severe or unusual symptoms. A brace is a support tool, not a substitute for diagnosis. If you are unsure about the cause of your symptoms or whether a brace is appropriate, professional evaluation can help clarify the right approach.
Conclusion: The Best Brace Is the One That Matches Your Needs
The best wrist brace for carpal tunnel support isn’t determined by rigidity, price, or padding. It’s determined by how well the brace supports the wrist in an appropriate position, fits securely without excessive pressure, and matches when and how you plan to use it. Understanding the features that matter — neutral-position support, adjustability, correct sizing, support structure, comfort, finger freedom, and ease of use — helps you evaluate any product with confidence.
This guide has covered what to look for in a wrist brace, why choosing can be confusing, the seven features that matter most, the difference between rigid and flexible braces, adjustable and fixed braces, nighttime and daytime use, fit and sizing, materials, the difference between compression and positional support, common buying mistakes, and when to seek professional advice. The goal has been to teach you how to identify a suitable brace — not to declare one product universally best.
Ready to Compare Your Wrist-Brace Options?
Still unsure which wrist brace fits your needs? Start with the features that actually matter: positioning, adjustability, fit, comfort, and intended use. The 1PCS Wrist Brace Carpal Tunnel Support is one example of an adjustable wrist brace design to evaluate using the framework in this guide.
View the Wrist BraceNeed help comparing options? Explore the FingerTipSplint FAQ or browse the FingerTipSplint wrist support products. For business or bulk inquiries, use the request a product quote page. For more educational resources, explore the wrist and finger support articles.